Copycat: Boden Yellow and Gray Sweater

I'm a cardigan girl, so when I set eyes on this by Boden sweater, I knew I needed to DIY one of my own! New Dress A Day - Boden Sweater Copycat - yellow and grey - Supplies

I had an almost identical grey sweater in my collection – aside from some thicker ribbing – but this sweater is something that can be snagged anywhere from Old Navy or Target, to a local thrift store.

New Dress A Day - Boden Sweater Copycat - yellow and grey - Supplies

(Sidenote – this is a project that can work for pretty much any sweater that you might have in your closet.)

Here’s a rundown of the supplies you’ll need:

New Dress A Day - Boden Sweater Copycat - yellow and grey - Supplies


1. Fabric Glue (this is an option if you don’t use #3, Stitch Witchery)

2. Needle and thread (grab a color that matches the selected ribbon)

3. Stitch Witchery (this is how I made this sweater, however using fabric glue or a sewing machine works fab too!)

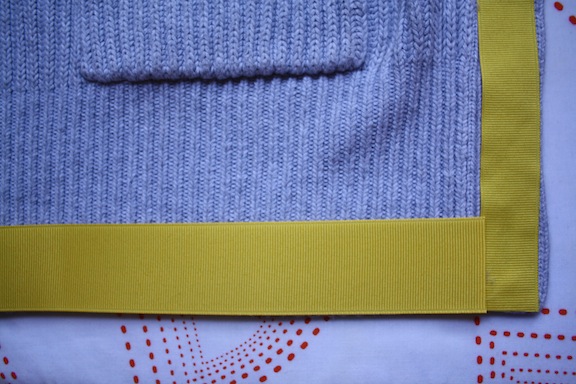
4. 7/8″ Ribbon (trim for everywhere except the cuffs and bottom edging)

5. 1 1/2″ Ribbon (trim for the cuffs and bottom edging)

The first step is to add ribbon (7/8″) around the inner, V-neck portion of the sweater. Stitch Witchery is the route I’m taking to adhere the ribbon to the sweater. In a nutshell, SW is a fusible bonding web material that with heat (and a little bit of steam from an iron) sticks fabrics together. I placed the Stitch Witchery down, added the ribbon on top of it, placed a wet rag on top of both layers, and then pressed everything down for a few seconds.

New Dress A Day - Boden Sweater Copycat - yellow and grey - Supplies

Post-pressing, my ribbon was in place. Stick, stack, stuck!


New Dress A Day - Boden Sweater Copycat - yellow and grey - Supplies

I repeated the previous step with the trim of the pockets…

New Dress A Day - Boden Sweater Copycat - yellow and grey - Supplies

…and the trim of the cuffs. To match the thicker stripe on the cuffs of the original piece, I used the 1 1/2″ ribbon here.

New Dress A Day - Boden Sweater Copycat - yellow and grey - Supplies

Same goes for the trim around the bottom of the sweater. The previous Stitch Witchery/iron down operation was repeated with the 1 1/2″ ribbon to line the bottom edge.

New Dress A Day - Boden Sweater Copycat - yellow and grey - Supplies

With the ribbon in place, the next step was adjusting the buttonholes. Because the ribbon was covering them up, they needed to be reopened. I took a pair of scissors and snipped slits in the ribbon from the underside of the sweater to open them back up for business.

New Dress A Day - Boden Sweater Copycat - yellow and grey - Supplies

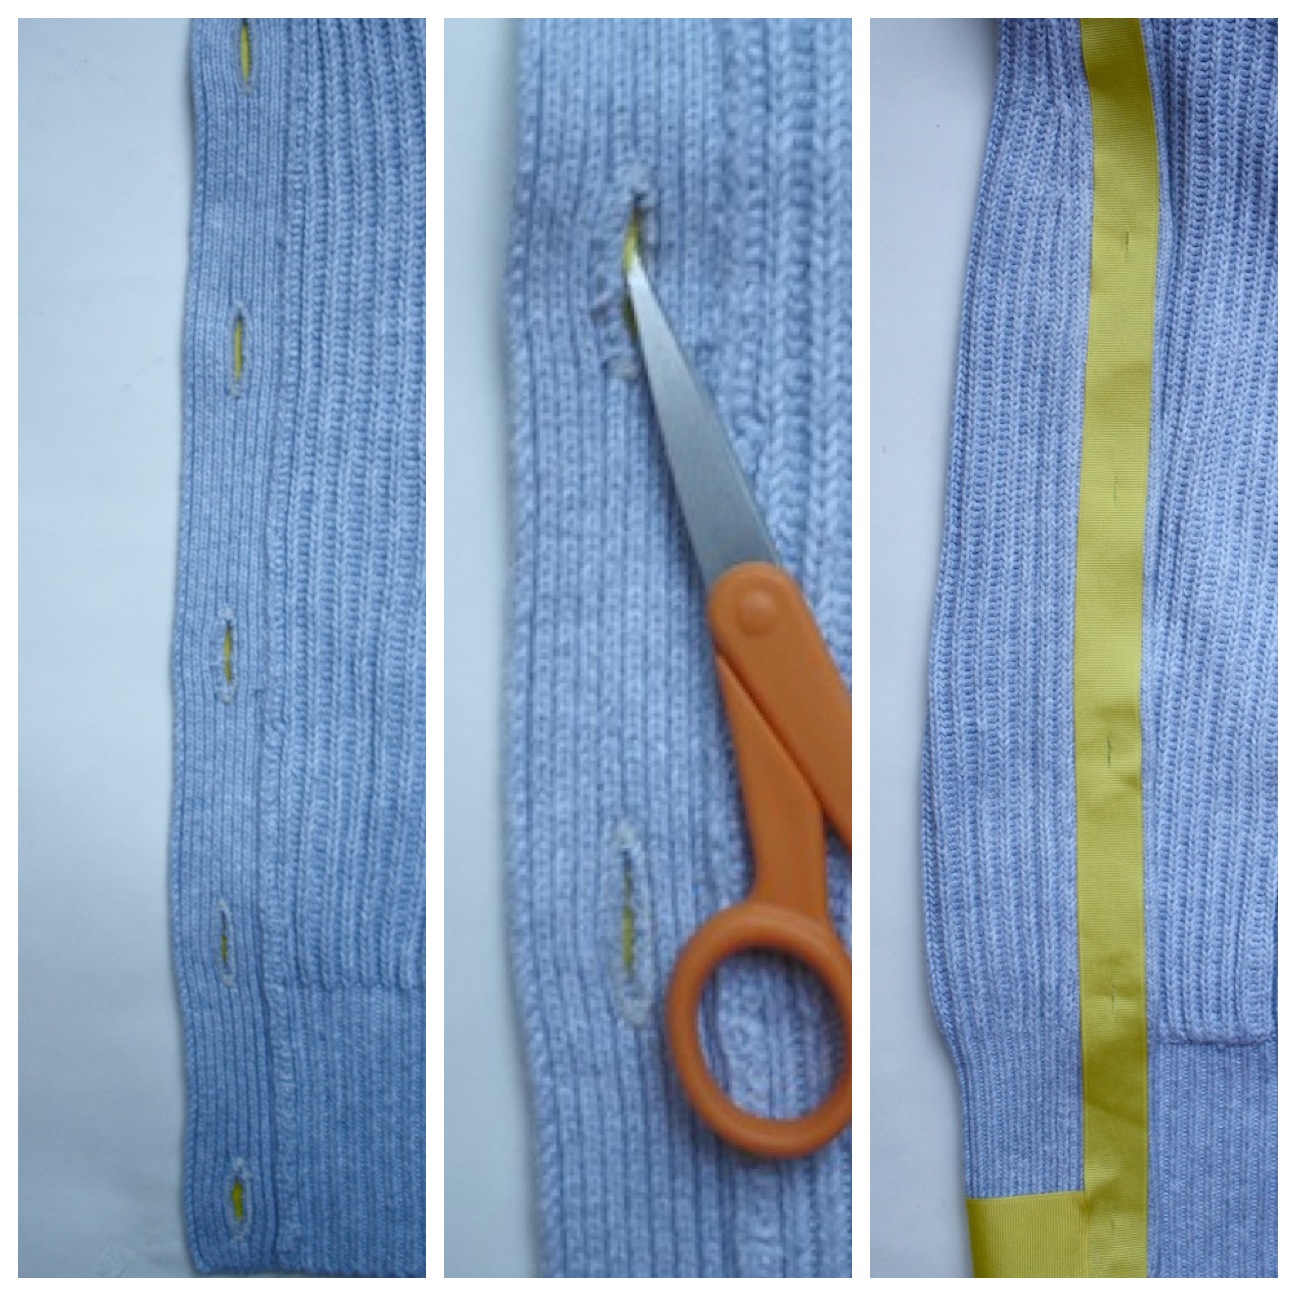
To avoid ribbon fraying in these buttonholes, I took the matching thread and needle…

New Dress A Day - Boden Sweater Copycat - yellow and grey - Supplies

…and created finished buttonholes using an overcast stitch. (Feel free to skip this step and use clear nail polish or Fray Check to stop any unraveling as well.) To make an overcast stitch, I began from the underside of the buttonhole and pulled the needle through (1), and then brought the needle back down on a slant through the buttonhole (2). Next I brought the needle back through the underside of the fabric again (3) and then repeated these three steps until the buttonhole was completely finished (4).

New Dress A Day - Boden Sweater Copycat - yellow and grey - Supplies

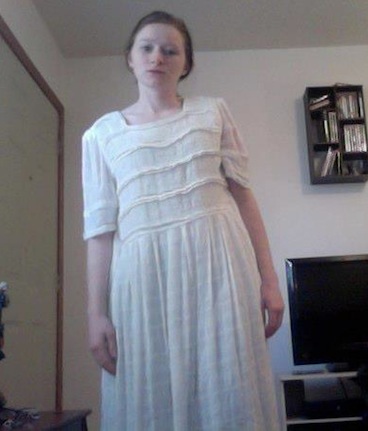
My new cardi is complete!

New Dress A Day - Boden Sweater Copycat - yellow and grey - Supplies

I love that it turned out just like the original by Boden piece!!

New Dress A Day - Boden Sweater Copycat - yellow and grey - Supplies

Using some ribbon, you get a whole new feel with a basic!

New Dress A Day - Boden Sweater Copycat - yellow and grey - Supplies

I originally saw this sweater on an actor from one of my fave shows so I crafted a post for HelloGiggles as well!  Head on over if you're curious...

I'm going to be wearing this a LOT this season!!

Kari's NDAD Creation

It's getting colder out, the holidays are around the corner, and I'm already thinking about what to wear for all the holiday events, from the cocktail parties to the weekend brunches. This year I'm definitely going to do some sort of winter whites and Kari's outfit is getting me excited to find one of my own.

I got this lovely sack from an antique shop. After talking the owner down to $3 I began to question even spending that much!

New Dress A Day - DIY - vintage dress

It was hideous, but the material is a beautiful lace on top and interesting plaid on the skirt that added promise!

Let's see what Kari makes with this one!

I removed the sleeves, the shoulder pads, and at least a foot of fabric from the length. I took in the sides next, which was about another foot. I'm all done!

New Dress A Day - DIY - vintage dress

I could not be happier with this beautiful dress!

This turned out so pretty, Kari! Add some tights and a sweater for a winter look and all you need is a fab statement necklace to make this rock for the summer. Love the texture of the bodice too. When are you heading back to that antique store?? Can't wait to see the next outfit remake!

Michelle's NDAD Creation

Michelle's creation today is something totally practical and useful. However, I love the story behind the creation even more. Check it out...

Hi, Marisa! Thanks so much for all your great inspirational pieces! I'm glad to know that there's someone else out there who shares my visions...like, when I see something that's blah and plain, and I see not what it IS but what it COULD BECOME!

I live in Indiana, and one of my best friends in the world, Barb, lives in San Diego. We actually met on Ebay, where I was selling some of the things I made. I sent her a little package of a few my creations, and the rest is history...we send each other packages every few months, filled with all sorts of goodies that we've each gathered with the other in mind! We have such a blast with this! It's been almost 10 years package exchanging, and we're still going strong!

I love going to the thrift store on Saturdays for quarter day, but sometimes there's a pretty big crowd. On one particular Saturday, I literally almost dove head first into the huge, 3 foot tall bin of household items, not because anyone else was there and might have gotten to it first, but because I spotted this adorable little homemade quilt at the bottom! It was in excellent condition.

New Dress A Day - DIY - vintage quilt

It had no batting, just a simple top and the back, which felt like it might have been made from a bed sheet. I just KNEW I was going to take that home and make matching tote bags for Barb and me!

 I washed it with fabric softener so it smelled delicious, grabbed my scissors, and started cutting it in half (it was perfectly square). I just folded up the material and stitched the sides shut - one side was the cut edge and the other side had the existing hem and border. I tucked the bottom under a little so it would hold bigger items like boxes of cereal or whatever, grabbed a couple of pieces of contrasting fabric strips to use as handles, and stitched the heck out of those so they wouldn't rip off. Just in case Barb wants to carry 30 or 40 pounds of canned goods in it, we can’t have the straps breaking! 

New Dress A Day - DIY - vintage quilt - repurposed tote bag

She wrote me when she got her package, and said, "That looks like a quilt!" It WAS a quilt but now it's a kickin' (12.5 cent) tote bag!

This is an easy project that ANYONE with just a little bit of sewing knowledge can make. I know most of your creations are clothing based, so maybe this will inspire you to dig through the household goods sections at the thrift store, because, hey, you can never, EVER have too many purses or bags! Keep up the great work, Michelle

I love this, Michelle! I think what I love the most is the pen pal relationship that you've made with Barb. I grew up having a bunch of pen pals and still stay in touch with a handful today. There is nothing better than snail mail coming from a friend, especially when it's a little care package. Can't wait to see what's next!