DIY Sequined Watermelon Clip

DIY Watermelon Sequined Clip

I love to eat watermelon and that goes the same for wearing watermelon too!

Here's an easy DIY to create a sparkly watermelon that works for shoe clips, hair clips, or even just a pin!

The supplies you'll need...

DIY Watermelon Sequined Clip

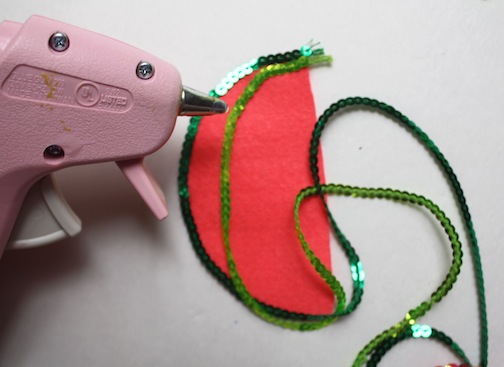
Just three shades of sequins (pink, lime green, kelly green and black if you want to create seeds), a piece of felt for the base, and a glue gun is all you need to make this adorable accessory.

First, trim the watermelon shape out of the piece of felt. I cut a semi-circle from the felt freehand, but feel free to use the bottom of a cup, bowl, Tupperware, etc. to create a perfect round edge.

DIY Watermelon Sequined Clip

The two green shades of sequins will act as the skin and the rind to the watermelon. Glue the darker green sequins down first, on the outside of the felt, and then glue the lighter shade of green right next to it.

DIY Watermelon Sequined Clip

Next start gluing down the pink sequins, going back and forth on the felt. Keep placing them down as close to the sequins next to them as possible.

DIY Watermelon Sequined Clip

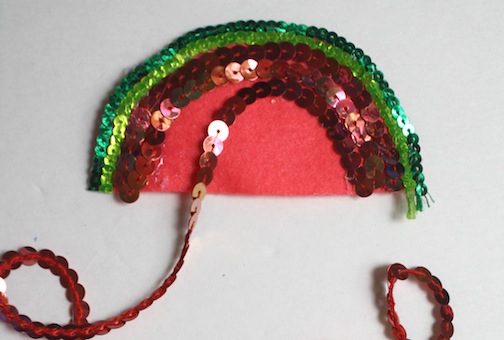
Once all the pink sequins are put down, your melon will be taking shape!!

DIY Watermelon Sequined Clip

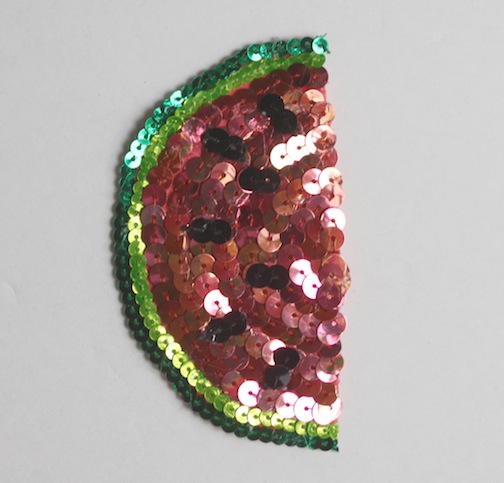
This is a perfect place to end unless you want to add some seeds! To add seeds, trim little sections of black sequins...

DIY Watermelon Sequined Clip

...and glue them onto your patch.

DIY Watermelon Sequined Clip

Depending on where you want to wear your patch, affix shoe clips, a hair clip, or a pin to the felt backing.

DIY Watermelon Sequined Clip

I wanted something for my hair, so I turned my melon into a clip!

DIY Watermelon Sequined Clip

How cute is this for summer??

DIY Watermelon Sequined Clip

It's the cutest accent to add to a denim jumper (like I did!) or just a t-shirt and jeans.

You probably shouldn't try the following though...

DIY Watermelon Sequined Clip

Sequins just aren't as juicy as the real thing!!

Remake: Tan Ankle Boots

I've been wearing this pair of tan booties for a few years now. We've been really good pals, but they've just been getting dirtier and dirtier and dirtier.

DIY Tan Boots - 1

Here's the thing - I got them on super sale from Cotton On. I'm talking like $10 on sale, ya feel?!

DIY Tan Boots - 2

So having to pass them along isn't the worst of times knowing they weren't an investment piece of any kind. However I broke them in to perfection.

DIY Tan Boots - 3

And that's the part that I don't want to move on from!!

DIY Tan Boots - 5

I know I can do it, but I just can't right now ;) SO, that's when I thought I could make them really fab one more time! Hello dye!

DIY tan boots - RIT dye

I thought that Rit's Evening Blue would be just the color to hide "Dirty Tan" (self named!)

DIY Tan Boots - Rit Dye 2

I grabbed a foam brush and created a dye bath with boiling water and a few tablespoons of dye. (I used a plastic cup to dip!)

DIY Tan Boots - Rit Dye 3

It was amazing to see how the shoes were taking to the dye! They're not leather, but just a textured cotton, so the dye absorption was on point!

DIY Tan Boots - Rit Dye 3

After a few more coats, we were good to go!

DIY Tan Boots - 5

I LOVE that the dye hides all the dirt now! So sneaky, yet SO good.

DIY Tan Boots - 6

Magic hour + new boots = a v happy Marisa!

DIY Tan Boots - 7

But I don't think we're done just yet...the wheels started turning to come up with another DIY on top of this DIY. Yeah, it's like Inception, but just go with it for the time being. 😂

DIY Boots - Before / After

Stay tuned!


Remake: Ice Dyed Top

I love to dye. We all know this! But, today's piece is getting dyed in a way that I've never tried before! (Cue the super excited feels rn.)

Snoops!

I had an ivory silk top that was going to be perfect for today's DIY.

white vintage silk top

I love the fluttery neck, but this color isn't the best with my skintone.

white vintage silk top 2

I couldn't wait to give this top a makeover!

white vintage silk top 3

I said this top was getting dyed in a brand new way I've never tried before...I'm ICE DYEING, using powder dye!

RIT powder dye

I picked my colors and then set up my dye station. Because I've never done this before, I wanted to make sure I wasn't going to stain everything. (**not an overstatement - I'm totally clumsy!)

dye station

I lined an old pan with a garbage bag to catch all the water and added a pantry shelf I snagged at the Container Store (Amazon has a bunch of options too!) to keep the top out of the pool of water that'll form after it melts. ❄️

ice dye station

I love the DIY setup! I took the top and wet it completely - this is just typical fare for dyeing. Always saturate your piece with water to make the dye work evenly!

Next came the ice!

ice dye station 2

I drizzled the powder dye all over the ice next and just waited for the cubes to melt!

ice dye station

Eeeeeeee! It's so close!

ice dye station 4

 (It actually took longer to melt than I had planned, which might have worked out for the best in regard to color saturation.)

DIY Ice Dye Top

How cool did this turn out?? 

DIY Ice Dye Top 2

I'm obsessed with ice dyeing and can't wait to test it out again!

DIY Ice Dye Top 4

The outfit was perfect for low-key dinner when paired with my favorite grey sweater coat and my thrifted Halston boots! I also paired it with this ivory vintage clutch that's currently in the NDAD shop!

DIY Ice Dye Top 5

The ivory helped make the fall colors pop!

DIY Ice Dye Top 6

For my first go at ice dyeing, it was a total success! I love the pattern ❤️.

Before / After Vintage TOP