DIY: Indigo Dyed Shawl

Today's post is a fun one!! I got together with crafty pal KC of Make Shop Live and the co-founder of the Academy of Handmade (for those crafters out there, check it out - it's a super rad community of crafty people with a yearly awards show just like the Oscars! The nominations begin today, so head on over and cast a vote using the code ILoveHandmade) to work on some Indigo dyeing, something I've never done before. KC is a pro, so I got a master class. I started with this vintage shrug that I've held onto for years, just waiting for the perfect project to use it for. I think you're going to like the outcome!

New Dress A Day - DIY - Indigo Dyeing - Vintage Shawl

To begin, you'll need a basic Indigo Dye Kit (here are two options - mini & large that can be found on Amazon for $12 and $17 respectively) as well as these supplies:

WHAT YOU'LL NEED:

(2) 5 gallon buckets with lid (The ones we used are from Home Depot.)

Plastic tarp / old shower curtain / some kind of covering for your workspace

Gloves (vinyl or latex)

Vinegar

Rubber bands, string, clothes pins, binder clips and other items that can be use to create resist patterns on the dyed item

Synthropol or phosphate free soap (Here's a cheap batch for $4 on Amazon)

The best pieces to dye will be items made out of natural fibers - 100% cotton, silk, hemp, wool, or rayon and should be pre-washed for optimum dyeing.

New Dress A Day - DIY - Indigo Dyeing - Vintage Shawl - Dye Bath

Prepare the Indigo bath following manufactures instructions. The Indigo will take around an hour to be ready for dyeing so in the meantime, set up your rinse bath. Using one of the buckets, get your rinse water started with warm water and a few drops of Synthropol. (The Synthropol bucket is in the back - fill it up about 2/3 full).

New Dress A Day - DIY - Indigo Dyeing - Vintage Shawl - Dye Bath

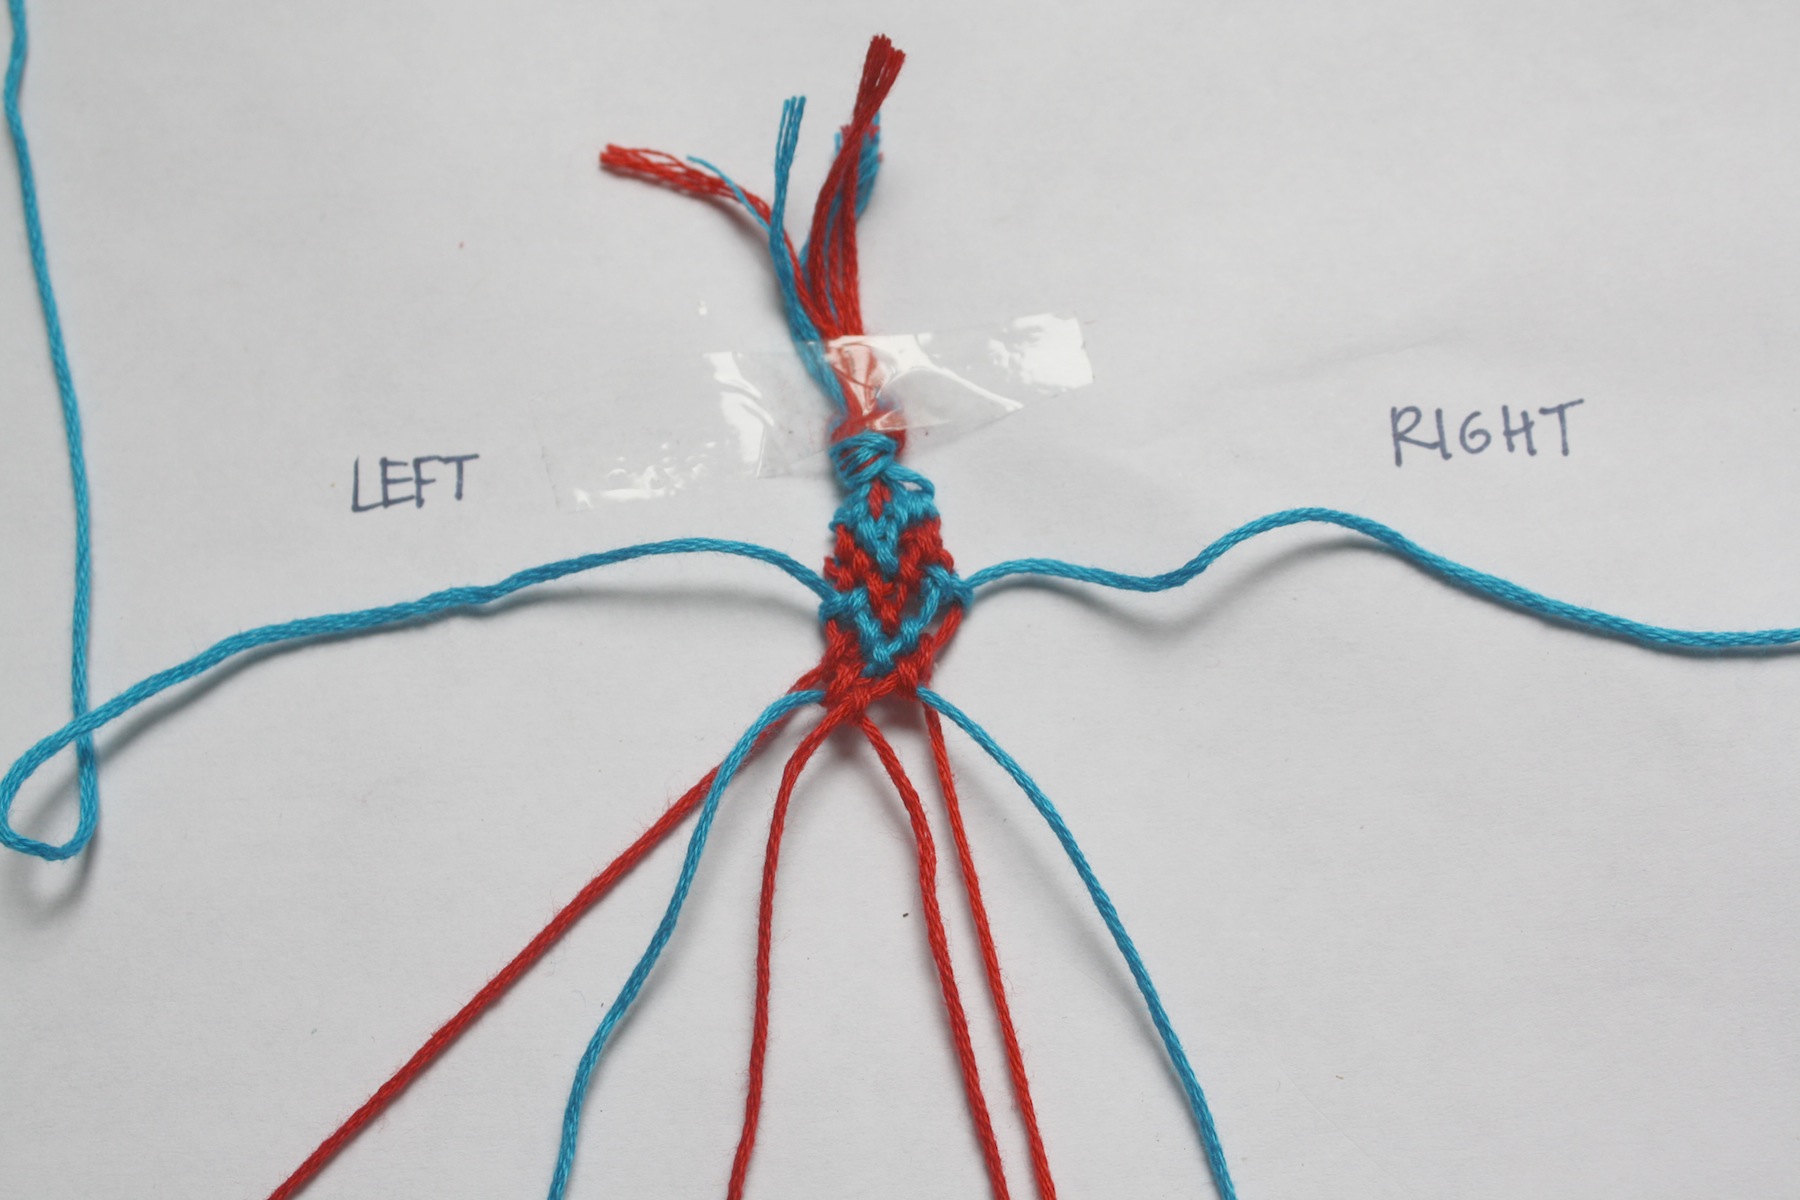
This mix is highly concentrated so use just one or two drops. Soak the items you will be dyeing for 2-3 minutes in this water bath to open up the fibers. This also helps reduce uneven dyeing or spotting. Wring out as much water as possible and then prepare any tie dye techniques using rubber bands or other resist instruments before adding to dye bath.

We wet the shawl, folded it up, and used binder clips as our resistant instruments. These happened to work best, but you can get creative and use washers or paper clips to wrap the fabric around.

New Dress A Day - DIY - Indigo Dyeing - Vintage Shawl - Dye Bath

Dye time! When dyeing, there are a few things to keep in mind. You want your fabric to move freely in the bucket without just resting on the bottom. This can cause spotting and uneven color if your item rests for an extended time on the bottom of the bucket. You will also want to be mindful that the Indigo process uses oxygen, so any extra oxygen introduced to the dye lessens the potency. You definitely do not want to over stir the bath and will want to push it around so that it is dyeing evenly without adding extra air instead. We used old wooden spoons and rulers to push the items around.

New Dress A Day - DIY - Indigo Dyeing - Vintage Shawl - Dye Bath

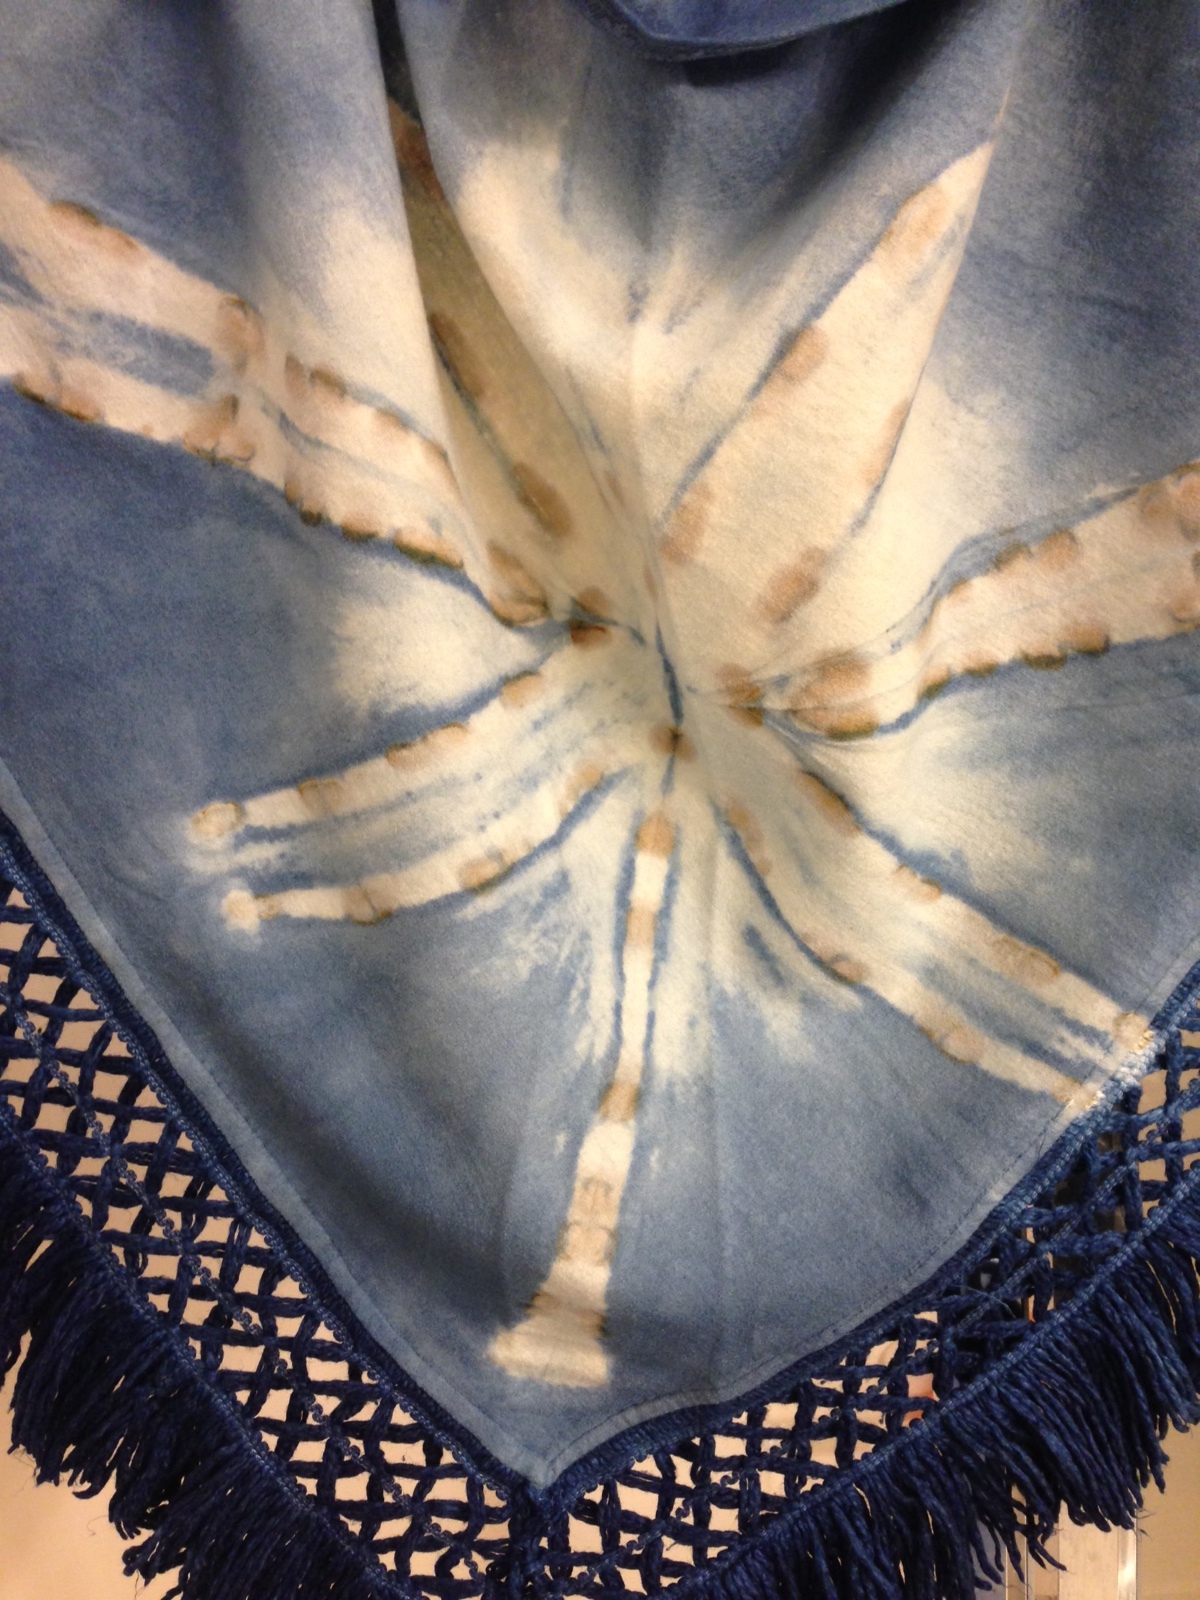
When the items leave the dye bath you will be able to see the oxygen process at work. The fabric changes color like magic! Indigo looks like a fluorescent yellow/green shade on the fabric once it comes out of the bath and then once it is exposed to air, you can see the process continue. The Indigo slowly changes the fabric from this green shade to a deep blue, the final color the piece will turn. This is one of the coolest parts of the whole process!

New Dress A Day - DIY - Indigo Dyeing - Vintage Shawl - Dye Bath

Your item may appear darker than the end result while drying. You can deepen the blue by introducing the item back into the dye bath and repeating the process as many times as you'd like to achieve a deeper color.

It's best to air dry the project completely before rinsing the color, usually overnight (24 hours is ideal). This really bonds the color as much as possible. Another trick to keep the color rich and deep, as well as prolonging fading, is to rinse with a mixture of water and vinegar. This 50/50 ratio of water to vinegar works really well in maintaining the color

(Note on Indigo: Indigo dye fades with wear and time. This is natural and one of the beautiful properties of this dye, so for this reason you may want to choose items that do not need heavy laundering to preserve color.)

New Dress A Day - DIY - Indigo Dyeing - Vintage Shawl - Dye Bath

Soak the fabric briefly in the vinegar water, then rinse in cold water until the water is clear. Follow up with a wash in Synthropol and you are good to go.

New Dress A Day - DIY - Indigo Dyeing - Vintage Shawl - Dye Bath

With my newly dyed shawl complete, I had a fun photo shoot with the lovely Shauna over at Penny Chic! (Head on over to Penny Chic to see more pics from the day!)

New Dress A Day - DIY - Indigo Dyeing - Vintage Shawl - Dye Bath

I love how bold the color turned out.

New Dress A Day - DIY - Indigo Dyeing - Vintage Shawl - Dye Bath

It's the best new cover-up to toss on top of a blouse when it's not super cold, but chilly enough to need an extra layer. Or, the perfect layer or big scarf to add on top of a thick jacket (I'm talkin' to you East Coasters/Mid-Westerners/other colder spots outside of the US that don't have these Southern California temperatures at the moment!)

New Dress A Day - DIY - Indigo Dyeing - Vintage Shawl - Dye Bath

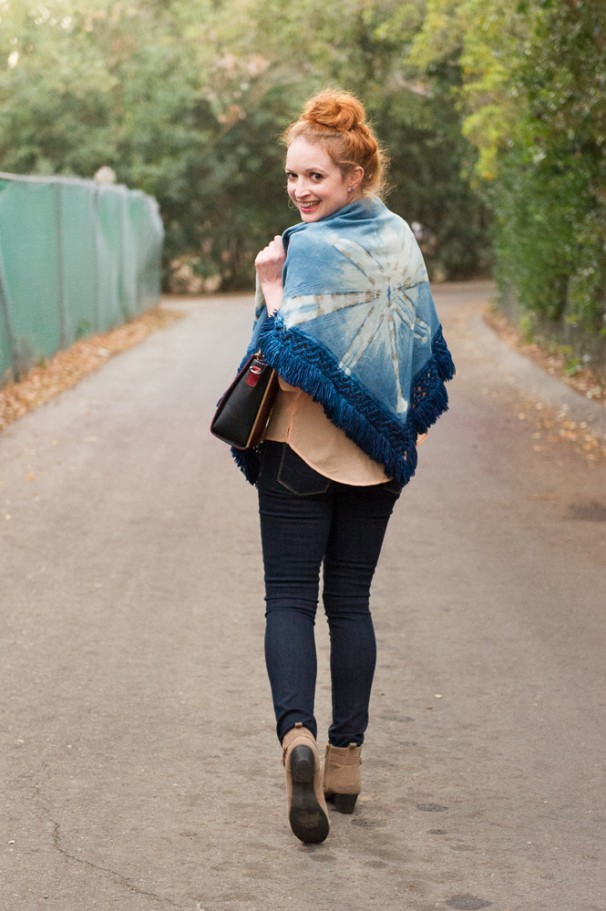
We paired the shawl with a gorge Boho top, statement necklace, and Denizen by Levi's jeans all from Target, a pair of ankle boots by Cotton On, and the most fun Sole Society purse.

New Dress A Day - DIY - Indigo Dyeing - Vintage Shawl - Dye Bath

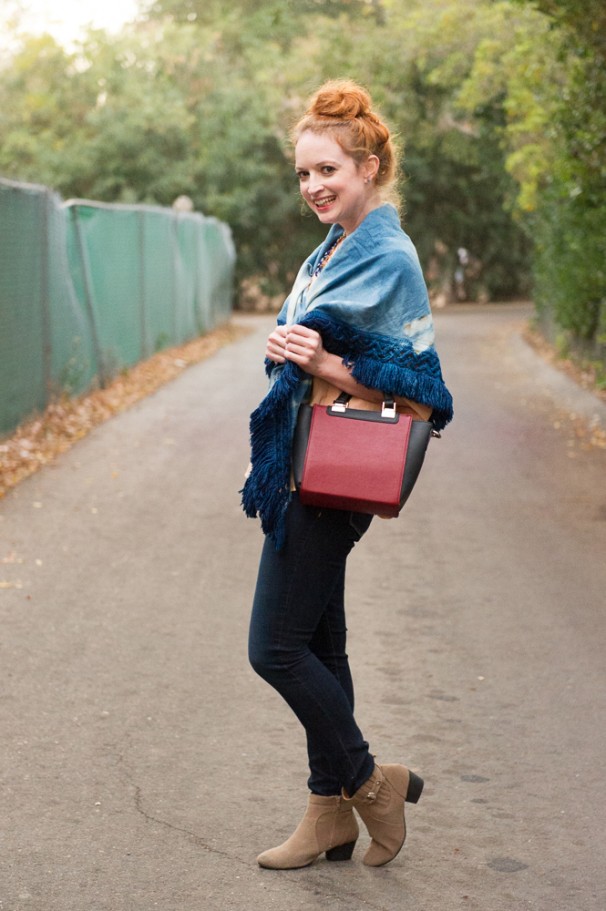
It's the cutest date night ensemble!!

New Dress A Day - DIY - Indigo Dyeing - Vintage Shawl - Dye Bath

Thank you to the fabulous Penny Chic team and Shideh Miller for photographing this chic and cozy ensemble!

Any of you guys have experience with Indigo dyeing? I'd love to hear your stories!

DIY: Olympic Rings Necklace

As the Olympics start today, I thought I'd repost one of my favorite pieces that I crafted back in 2012 for the summer Olympics!!  I can't wait to watch the figure skating and the skiing/snowboarding and root for USA! So, I'm totally an Olympic addict.

Olympic Rings

I absolutely love the Olympics and get so excited every two years because I get sucked into the competitions...all the competitions!

After seeing those rings on screen all the time, they've been lasered into my head (along with the theme song - I'll spare y'all the clip...I can't stop singing it after every commercial break!) and I came up with a fun project to show my Olympic spirit!

It's necklace time!!  I began with five key rings...

New Dress A Day - DIY - Vintage Dress - Olympic Rings Necklace - 5 Key Rings - 81

...and created the formation, attaching the rings to each other.

New Dress A Day - DIY - Vintage Dress - Olympic Rings Necklace - Key Rings - 81

Time to get these bad boys in their right shades!

Taking a cue from the Anthropologie lookalike necklace I made a few months back...

New-Dress-a-Day-Necklace-DIY-Love-Necklace-After-ECU-172

...I decided to work with embroidery floss again!

New Dress A Day - DIY - Vintage Dress - Olympic Rings Necklace - Embroidery Floss - 81

I began with the ring all the way to the left and grabbed the floss in blue!  I kept the floss in place by putting it right at the ring opening before adding E-6000 glue to really secure.

New Dress A Day - DIY - Vintage Dress - Olympic Rings Necklace - Start Point - 81

Then began the wrapping!  I did this method for each of the rings.  I had the top row of three complete...

New Dress A Day - DIY - Vintage Dress - Olympic Rings Necklace - 3 Rings Finished - 81

...and then got the final two finished as well.

New Dress A Day - DIY - Vintage Dress - Olympic Rings Necklace - Intact Rings - 81

I took some craft chain I picked up at Joann's along with jump rings and connected both to the blue and red rings at each end.

New Dress A Day - DIY - Vintage Dress - Olympic Rings Necklace - Spring Ring Attachment - 81

Once the chain was connected, I added a spring ring clasp to one of ends of the chain...

New Dress A Day - DIY - Vintage Dress - Olympic Rings Necklace - Necklace Clasp - 81

I couldn't wait to get this around my neck!

New Dress A Day - DIY - Vintage Dress - Olympic Rings Necklace - Finished Rings - 81

It was like my gold medal!

New Dress A Day - DIY - Olympic Rings Necklace - Finished Look

DIY: Heart Friendship Bracelet

I was asked by eHow to contribute a Valentine's Day article on how to make heart friendship bracelets and I couldn't wait to finish so I could post here! I made a slew of them for my wrists and will be wearing them loud and proud, not just on V-Day but all the time. DIY Heart Friendship Bracelet - ehow - Marisa Lynch - Valentine's Day

If you would like to see the project steps in slideshow mode, head on over HERE to eHow to check it out with clickable slides!

In order to create your heart friendship bracelet, you'll need: 2 skeins of embroidery floss, 4 30" strands per color, a pair of scissors, and a clipboard or tape to hold the bracelet in place while working.

DIY Heart Friendship Bracelet - ehow - Marisa Lynch - Valentine's Day

Take the eight strands of embroidery floss and tie them together in a knot leaving about an inch and a half of floss above the knot. (This will be used to tie the bracelet together at the end.) Lay out the eight strands and split them up (four and four) onto the right side and left side of the workspace. Alternate colors (in this case - blue, red, blue, red) on the left side and then mirror these four on the right side (in this case - red, blue, red, blue).

DIY Heart Friendship Bracelet - ehow - Marisa Lynch - Valentine's Day

Begin the bracelet on the left side by making a forward knot using the strand all the way on the left outer end (blue) and the second strand right next to it (red).

(*To create a forward knot, make a 4 with the working string, loop it under the other string, pull it through the opening and bring it to the top of the bracelet. Do this two times to create one forward knot.)

DIY Heart Friendship Bracelet - ehow - Marisa Lynch - Valentine's Day

Repeat this step with the next two strands (third and fourth threads, corresponding blue and red colors) and stop at the center.

DIY Heart Friendship Bracelet - ehow - Marisa Lynch - Valentine's Day

Now that the left side has been completed, these same steps will be mirrored on the right side of the bracelet. Instead of a forward knot that was used on the left side, a backward knot will be made using the strand all the way on the right outer end (blue) and the second strand right next to it (red).

(*To create a backward knot, which is virtually a mirror of the forward knot on the right side, make a backwards 4 with the working string, loop it under the other string, pull it through the opening, and bring it to the top of the bracelet. Do this two times to create one backward knot.)

DIY Heart Friendship Bracelet - ehow - Marisa Lynch - Valentine's Day

Repeat this step with the next two strands (third and fourth threads, corresponding blue and red colors) and stop at the center.

DIY Heart Friendship Bracelet - ehow - Marisa Lynch - Valentine's Day

Connect the two middle strands by creating a backward knot using the strand on the right (the last one used). This brings both sides together as one.

DIY Heart Friendship Bracelet - ehow - Marisa Lynch - Valentine's Day

Repeat the above steps and create one more row in the exact same way, using the outermost string on each side.

DIY Heart Friendship Bracelet - ehow - Marisa Lynch - Valentine's Day

Now that the second row is completed (we’ll call these the REGULAR rows as they will look like a traditional chevron styled friendship bracelet), the third row is going to be done a little differently (we’ll call these the NEW rows). Take the second string on the left side (red) and make a backward knot on the first string (blue).

DIY Heart Friendship Bracelet - ehow - Marisa Lynch - Valentine's Day

After the backward knot is completed, move the string that was used (second string in red) to the top left side and create two more forward knots using the first string (blue) on the third and fourth strings and stop at the center. This is where the heart shape begins to take form.

DIY Heart Friendship Bracelet - ehow - Marisa Lynch - Valentine's Day

This same step will be mirrored for the right side. Take the second string on the right side (red) and make a forward knot on the first string (blue).

DIY Heart Friendship Bracelet - ehow - Marisa Lynch - Valentine's Day

After the forward knot is completed, move the string that was used (second string in red) to the top right side and create two more backward knots using the first string (blue) on the third and fourth strings and stop at the center.

DIY Heart Friendship Bracelet - ehow - Marisa Lynch - Valentine's Day

Connect the two middle strands by creating a backward knot using the strand on the right (the last one used). This brings both sides together as one.

DIY Heart Friendship Bracelet - ehow - Marisa Lynch - Valentine's Day

Repeat the above steps for making a NEW row and create one more NEW row in the exact same way, using the second string on each side.

DIY Heart Friendship Bracelet - ehow - Marisa Lynch - Valentine's Day

The bracelet pattern is now set. Two REGULAR rows of the basic forward knots on the left side and backward knots on the right side followed by two NEW rows of the backward/forward knots on the left side and forward/backward knots on the right side.

DIY Heart Friendship Bracelet - ehow - Marisa Lynch - Valentine's Day

Repeat and continue these steps until enough bracelet has been made to fit your wrist.

DIY Heart Friendship Bracelet - ehow - Marisa Lynch - Valentine's Day

This is such fun to make bracelets in school colors, fave sports teams, or just colors you heart. I just might make a few more before next week!