DIY: Rhinestone Encrusted Compact

On the 4th day of holiday DIY my true love gave to me, a rhinestone encrusted compact to help me check my teeth. And the cheesy rhymes continue! Day 4: Rhinestone Encrusted Compact

New Dress A Day - DIY - rhinestone encrusted compact

I LOVE this project so much because not only is it fun and glitzy, it really couldn't be easier to make!  It's something that you can craft on crafternoons with friends or something to give to all the office pals. And each one will run you less than $2 to make!

This DIY only takes three supplies...

New Dress A Day - DIY - rhinestoned compact

1. E6000 glue

2. Rhinestones (I snagged these two packs at the Dollar Tree in NC!)

3. Compact (This came from the same Dollar Tree that I found the rhinestones - the idea actually came to me while getting some last-minute wrapping paper and bows!)

The first thing I did was play around with the stones to come up with a pattern to adhere to the compact.

New Dress A Day - DIY - rhinestoned compact

Once I figured out what I wanted to put on top...

New Dress A Day - DIY - rhinestoned compact

...I started to glue everything in place.  I dabbed the backs of the rhinestones with E6000...

New Dress A Day - DIY - rhinestoned compact

...and placed them on top of the compact!

New Dress A Day - DIY - rhinestoned compact

I let the compact completely dry for a few hours and was left with such a chic new mirror.

New Dress A Day - DIY - rhinestoned compact

I'd be super jazzed to receive this in my stocking!!

More under $5 DIYs to come...stay tuned!

Last Minute Christmas Magazine Sale at DiscountMags.com! Save up to 90% off on 100+ magazines. Free shipping, no auto-renewal and no tax! (Valid 12/21 to 12/22 until 11:59 pm EST)

DIY: Painted Kitchen Utensils

On the 3rd day of holiday DIY my true love gave to me, a bunch of kitchen utensils that will help to stir my tea. OK, I tried with something kitchen-y to rhyme with me...twas harder than I planned! After scouring Pinterest, like you do, I saw a bunch of kitchen utensils (serving spoons, spatulas) that were painted!  I thought that they would make an easy and practical gift that you can bring to your party hosts or to stick in stockings!!

DAY 3: Painted Kitchen Utensils

New Dress A Day - DIY - painted kitchen utensils

Here's what you'll need...

New Dress A Day - DIY - painted kitchen utensils

1. Kitchen utensils (I found these wooden and bamboo spoons at the 99 cent store)

2. Acrylic paint (go for holiday shades, or ones that match the kitchen of the recipient!)

3. Clear shellac (this Zinsser spray is genius - it's non-toxic so it works on things like these utensils or any other craft projects!)

4. Painter's tape (This Scotch blue roll works well or you can always use masking or duct tape that might be in your house already)

My first step was taping the utensils.  I chose how low I wanted the paint to go and put a piece around the area picked.

New Dress A Day - DIY - painted kitchen utensils

Next it was paint time!  I had some foam brushes that I used, but feel free to go at it with your fingers!  This is also a fun project that kids can get involved with too - nothing like some family finger painting!

New Dress A Day - DIY - painted kitchen utensils

With fun shades painted first...

New Dress A Day - DIY - painted kitchen utensils

...I finished up my last two utensils with a subtle shade of gold.

New Dress A Day - DIY - painted kitchen utensils

Once the paint is dry, spray the clear shellac on top of the painted areas and let dry for at least an hour.  After it dries, take off the painter's tape and your project is complete!

My mom is definitely not going to be surprised when she sees these popping out of her stocking next week.

New Dress A Day - DIY - painted kitchen utensils

This is a fab hostess gift year round too!  I should make a stash to have on hand...

More DIYs coming tomorrow!!

Katharina's NDAD Creation: Holiday Edition

As soon as Katharina sent this my way, I had to post it! We're all in holiday mode and everywhere I turn there's decor. Be it in stores, in front of people's houses, and even on cars! I was lucky enough to catch a Hanukkah parade in LA that consisted of a string of cars driving with twinkle light menorahs on their roofs! I need some holiday car bling! In the meantime, check this project out...

Hello from Rio!  Last year, I was amazed with a picture I found on Tumblr...

New Dress A Day - DIY Christmas ornament hanging tree

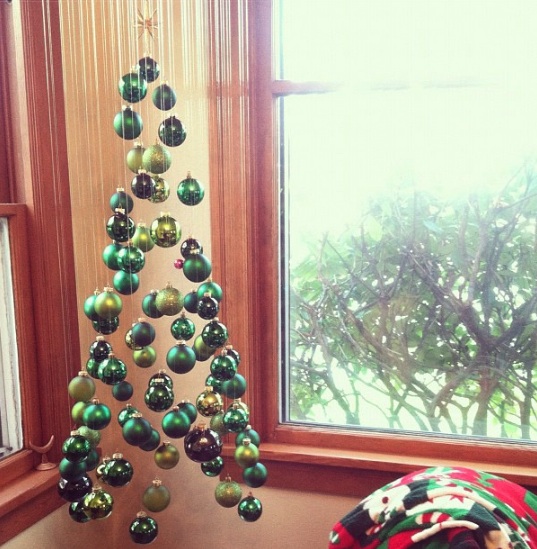
...and it served as inspiration for my mother and sister to make our own. We had no idea how they made it, so we created something up ourselves.

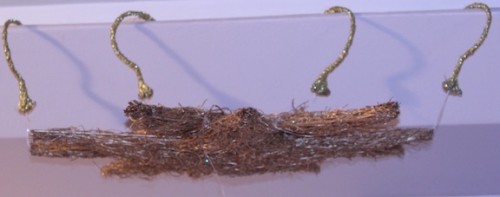
We bought two stars made of some sort of woven straw to serve as a base and then my mom tied them together. We hung it to our ceiling using hooks that my grandfather had made for my fifteenth party. In Brazil, we don't have sweet sixteen parties, we celebrate girls' 15 years, similar to a quinceañera).

New Dress A Day - DIY Christmas ornament hanging tree


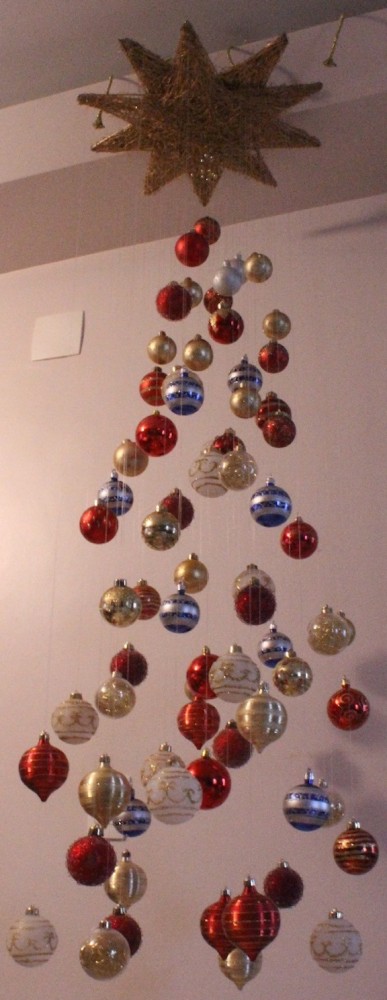
After that we sewed each ornament onto the base, using a whole lot of nylon thread! Yes, the tree was hanging the entire time, so we stood on chairs because we needed to see the height of each ornament as we placed it. It was three days of work with  glitter all over our dining living room area to show for it, but we did it!

New Dress A Day - DIY Christmas ornament hanging tree

Of course, during the process we looked up "hanging Christmas tree" and saw the there was a much simpler way to do it, with hooks and a different base, but we're still proud of our version! You see, when you live in a hot place like Rio, where Christmas is during the summer, the whole fake snow/pine tree act just doesn't cut it. I think our tree is more tropical weather appropriate.

New Dress A Day - DIY Christmas ornament hanging tree - Grey's Anatomy Christmas

PS, this next picture is the view from under the tree.

New Dress A Day - DIY Christmas ornament hanging tree

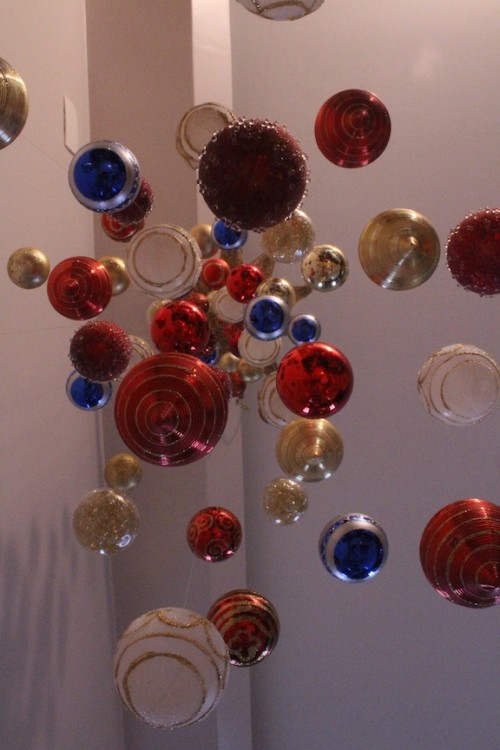
My sister and I love to lie under Christmas trees and look at the twinkling lights, just like Meredith, George and Izzie did on Grey's Anatomy.

New Dress A Day - DIY Christmas ornament hanging tree - Grey's Anatomy Christmas


Doing that underneath this tree is a whole other experience! Hope you liked it, Marisa! Boas Festas! ("Happy Holidays" in Portuguese), Feliz Natal (Merry Christmas), e feliz ano novo (Happy New Year)!

Katharina, your tree is just spectacular! I think it looks amazing and I love that it was a family affair. Everyone got involved to create this beautiful piece which brings a smile to my face. You're totally right - how bizarre must it be in tropical weather to have a big pine tree in your house? This does the trick perfectly and it is so perfect for the holidays! I need to try this on out at some point myself. Feliz ano novo to you too!