diy

DIY: Palm Springs Caftan

We’re in the thick of summer and all I want is a weekend away at a pool with my BFFs. Palm Springs, here we come! To fit in with the desert vibes, I’m thinking vintage patterns, bright colors, and something super retro. A DIY caftan is the just the thing I’m going to make and bring with to lounge poolside in!

I went to JOANN to find the perfect pattern and fabric combo to get my piece started!

Here's what you'll need:
Pattern (Simplicity has SO many cool reissue patterns from the 60s/70s! It took me a while to settle on my pick!)

Fabric (I wanted something bright and desert-y and went with this cotton pattern. I got four yards just to make sure there was enough and to have the option of crafting a belt or head scarf with the remnants.)

August - Fabric Option

Thread (Find something that matches your fabric)

**Depending on pattern, you might also need the following: (Just check out the back of your pattern package where additional supplies will be listed.) Fusable interfacing, zippers, hook & eye closures

August post - supplies

I found the perfect pattern while browsing - I wanted to make all three of the options but decided on the top left. (Stripes FTW!) I mean we’re going to Palm Springs, so let’s keep it short!

I checked out the step by step instructions on the back of the pattern and started planning. For any sewing newbie, these steps are super helpful in understanding the best way to piece together your garment!

I began with the pattern and cut out the pieces that were needed to make my caftan option and then pressed the pattern pieces with an iron to remove any wrinkles.

August - Process Shots

I did a quick press of the fabric as well, pinned the pattern to my fabric, and cut the three pieces out. There’s such a sense of accomplishment once you have all your pieces ready to go!

August - Patterns

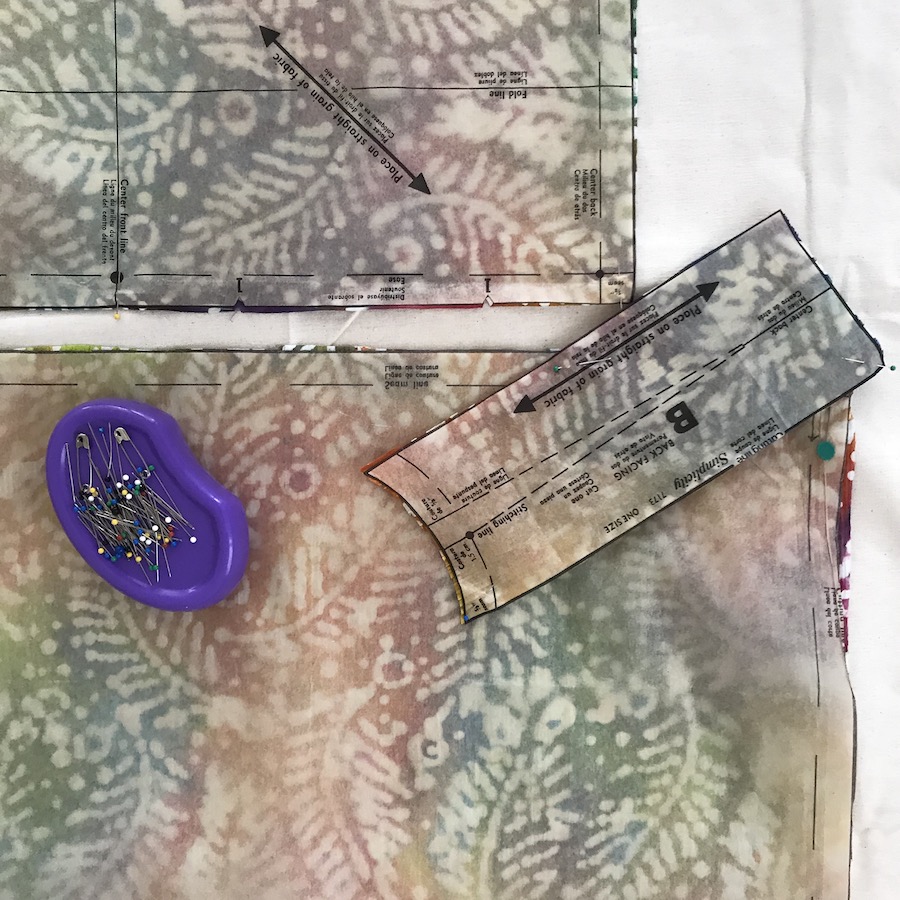
Following the directions on the pattern package, I cut out fusible interfacing for the collar pattern and ironed it to the fabric.

August - Fusible interfacing

Now it was time to sew all the pattern pieces together! I began with the collar - following the directions I pinned my piece in place…

August - Pinned Collar

...stitched the ends together and then turned the collar inside out.

August - Fused Collar

Next was the rest of the caftan! I attached my collar to the neckline...

August - Sewing Machine

...stitched the sides of the piece leaving room for the sleeves and then created a hem.

August - Fabric

And just like that, I’m ready for Palm Springs! 🌴 

August - After Caftan

Colorful and outfitted in a vintage straw had, because that’s how you do in the desert :)

August - Hat & Caftan

This is perfect for over a swimsuit, or to cover shoulders if you’re prone to burns like I am!

I also had the perfect clutch to pair with my caftan! Yellow straw clutch, FTW!

August - straw clutch

This is making me want to sew caftans to wear each day of the week!

August - Caftan DIY

I’m totally going to become that girl! :) Caftan Party, USA!

August - Side by Side

17 Days Til I Do!

Hello friends! Sorry for the delay in the series - I've been abroad prepping for the wedding and well the wifi just wasn't strong enough to upload all the imagery. So I'm going to get these in where I can! Thank you all for your patience!

This dress was one of my faves!

NDAD - Day 17 - Vintage Wedding Dress

I used a portion of the dress on Day 25 to craft the super snazzy bag below but there was so much left to work with!

Day 25 - Before/After

I just loved the full skirt. 

NDAD - Day 17 - Vintage Wedding Dress 2

I had some ideas for this piece from the get go! 

NDAD - Day 17 - Vintage Wedding Dress

I wanted to remove all the appliques (which I did), dye it graphite (which I did) and hopefully wear it with any basic t-shirt or a short sleeved cashmere sweater to snazz it up! (which I did...NOT!)

Day 17 - Dye & DIY

Sadly post dye, the skirt ended up looking like the below! I realized when I removed the appliques, there was still portions of glue on the skirt where they were applied. They weren't just sewn on, they were also glued!

IMG_1656 2.JPG

So, what to do now? I still loved the idea of creating a skirt, but needed a different plan. Off to tie dyeing I went!

I took a kit with colors that would mesh well with the already dyed grey on the skirt. I was thinking black, blue and aqua would be the perfect match!

Day 17 - Dye DIY.png

I wet the skirt, rubber banded the skirt and then got to dyeing! (Little trick - take a baking pan and line it with a plastic trash bag to keep all the colors together and from getting all over the place!

Day 17 - Dye Process

When I was complete, my skirt looked like this!

IMG_1668.JPG

I let it sit overnight to fully saturate all the dyes...

IMG_1937.JPG

...then de-rubber banded it, washed it out with cold water until the colors stopped running and then let it hang dry.

The outcome...

IMG_2026.JPG

Pretty fantastic, right?

IMG_2030.JPG

I would never have gone the tie dye route if it weren't for the little snafu with the glue spots! I'm actually super thankful this little issue came up because the skirt is just awesome now!

Day 17 - After

And I still have plans to wear it the same way! T shirt and short sleeved cashmere sweater (when it gets cold) here I come!

NDAD - Day 17 - Upcycled Wedding Dress

Such a fun upcycle here...can't wait to mix and match this skirt with everything!

NDAD - Day 17 - Before/After

17 days til I do!

18 Days Til I Do!

18 days! Today's dress was super soft and flowy!

IMG_1685.JPG

The cuffs didn't snap for me...

IMG_1687.JPG

...because they were too tight, but we can fix that!

NDAD - Day 18 - Vintage Wedding Dress 2

The neckline was fabulous and you might not be able to see so well in this shot, but there's a few spots of sequin detailing.

NDAD - Day 18 - Vintage Wedding Dress 3

There's the detailing!! I started with some dye, Navy Blue this time!

IMG_1738.JPG

When the dress came out, it was more of a bluish / lavender color - not as dark as I was planning for, BUT it still turned out so pretty!

I started off with some trimming! I cut the length a bit to create more of a short and summery dress.

NDAD - Day 18 - Vintage Wedding Dress Trimming Length

After pinning the bottom of the dress to prep for a new seam, I moved onto the rest of the piece. There was a ribbon that was falling apart sewn to the back of the dress that I removed along with the sleeves!

NDAD - Day 18 - Vintage Wedding Dress Sleeve Removing & Sewing

I just loved the lace detail and felt that the sleeves didn't totally do it justice. Then it was time to sew everything together!

Voila, new dress is done!

NDAD - Day 18 - Upcycled Vintage Wedding Dress

I just love how this turned out. The lace detail down the front pops now!

NDAD - Day 18 - Upcycled Vintage Wedding Dress

My ring matches this dress pretty awesomely too! (Thanks to my fiancé for calling that out to my attention and taking this lovely shot!)

Upcycled Vintage Wedding Dress

The dress is so much lighter feeling and something that I would have bought off the rack. I love how the neckline is shaped the most!

NDAD - Day 18 - Upcycled Vintage Wedding Dress 2

We were off to one of our last dinner date nights before the wedding and the lovely servers and team at our favorite Italian restaurant treated us to some cannolis. 

NDAD - Day 18 - Upcycled Vintage Wedding Dress Cannolis

I was obsessed with "Congratulations" written on the plate and then those cannolis...❤️ ❤️❤️ As a kid my favorite cake filling was cannoli! We used to go to this Italian bakery in my town for birthdays growing up and it's still one of my favorites! 

NDAD - Day 18 - Upcycled Vintage Wedding Dress Wine

I also brought a leather jacket to wear on top of my dress for when it got a bit chillier later on in the evening. I think this is a super fun way to give this soft look a little edge. 

NDAD - Day 18 - Upcycled Vintage Wedding Dress with Leather Jacket

I just love the color - another one down! 

Day 18 - Before:After.png

18 days til I do!