Remake: Red & White Striped Jumpsuit

One word: JUMPSUIT!!! New Dress A Day - DIY - Vintage 80s pantsuit - Goodwill

I was beyond in love with this piece and honestly, if it wasn't so tight in the crotch-al area (you gals know what I mean) I would have made this work. Unfortunately circulation was being cut off and it just wasn't meant to be.

New Dress A Day - DIY - Vintage 80s pantsuit - Goodwill

There was a lot of fab going on in a Michael J. Fox/Back to the Future kinda way (look at those shoulders!!)...

New Dress A Day - DIY - Vintage 80s pantsuit - Goodwill

...but the bottom portion had to get loosened up a bit. And by a bit, I mean completely!

To begin, I trimmed the pant legs to right above the knees.

New Dress A Day - DIY - Vintage 80s pantsuit - Goodwill

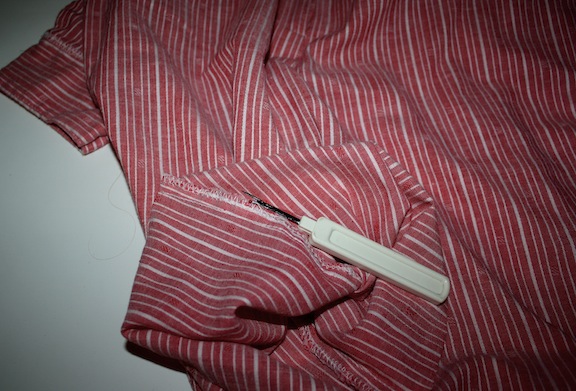
Post trim, I needed to open up that crotch-al area!! I'm turning this into a skirt, so I began to remove all the stitches on the inseam.
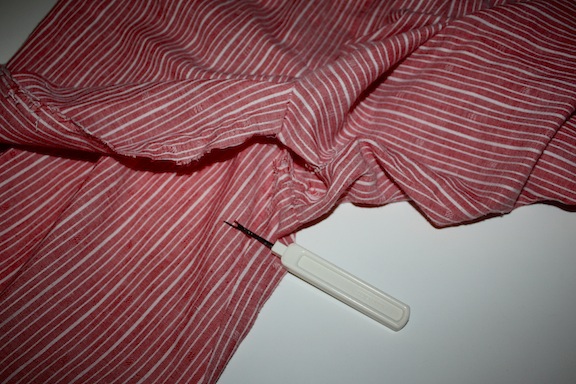
New Dress A Day - DIY - Vintage 80s pantsuit - Goodwill

Almost done!!

New Dress A Day - DIY - Vintage 80s pantsuit - Goodwill

Once the bottom portion was completely opened I re-pieced together the front and the back, pinning a new seam down the front center...

New Dress A Day - DIY - Vintage 80s pantsuit - Goodwill

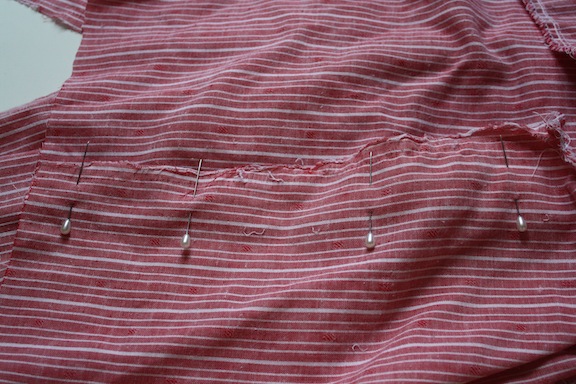
...and one down the back. I went on a slight diagonal just to give a little more wiggle room :)

New Dress A Day - DIY - Vintage 80s pantsuit - Goodwill

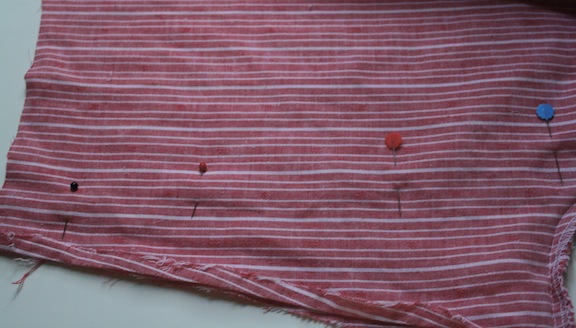
I stitched up my seams on the front and back of the piece...

New Dress A Day - DIY - Vintage 80s pantsuit - Goodwill

...and then stitched a new hem.

New Dress A Day - DIY - Vintage 80s pantsuit - Goodwill

My brand new piece is looking good!!!

New Dress A Day - DIY - Vintage 80s pantsuit - Goodwill

I must say that by making that one major tweak, I'm highly in love with how the former jumpsuit looks now! I'm poppin' collars like a boss!!

New Dress A Day - DIY - Vintage 80s pantsuit - Goodwill

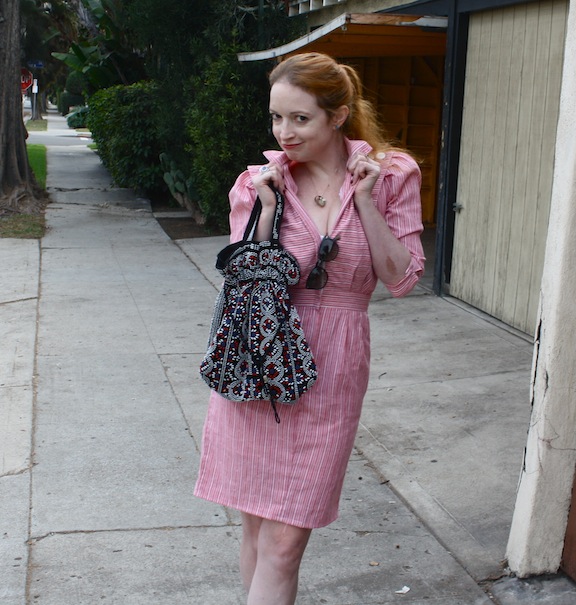
I paired my new dress with some black BCBG heels and a vintage beaded purse to break up the red/white palette.

New Dress A Day - DIY - Vintage 80s pantsuit - Goodwill

And even though the top portion still feels a bit retro, the pockets and cleaned up feel of the bottom give it a totally current look.

New Dress A Day - DIY - Vintage 80s pantsuit - Goodwill

It's still warm here in Southern California, so my "winter" wardrobe has been a bit modified this season! This is a piece that I can't get enough of, so I'll be wearing it again soon. Perhaps when it actually hits 50 degrees I can add some stockings and a sweater?!?

New Dress A Day - DIY - Vintage 80s pantsuit - Goodwill

Also, the zippered area in front makes this piece SO easy to get in and out of! Zipper > buttons, any day!!

Copycat: Hudson Brit Punk Jeans

I haven't done a fun denim DIY in a little while, so when I found these rocker jeans by Hudson I had to add them to the list!! I saw them being worn by Lucy Hale (Aria) on Pretty Little Liars (yes, I've started to get a little sucked in!) and the wheels started turning. (For those Pretty Little Liars fans, you can head over here to HelloGiggles to read the post with the full TV tie in!) New Dress A Day - Hudson Jeans Copycat - DIY - dyed jeans

The actual jeans on Lucy are by Hudson and they’re an ode to the Union Jack flag, in a deconstructed way. It's Brit punk, fo sho, and I wanted to try my hand at remaking them!

New Dress A Day - DIY - Hudson Jeans - Collin Brit Jeans

The key to remaking this piece is the base....

...a pair of black jeans that can be bleached and re-dyed with red and blue shades to match the original piece.

Here’s a rundown of the supplies you’ll need:

New Dress A Day - DIY - Hudson Jeans - Collin Brit Jeans

1. Dye and dye remover/bleach – I grabbed a few shades of Rit Dye to match as well as their Dye Fixative, but I ended up going with some basic bleach as well)

2. Any sort of clips/clamps

3. Black Jeans (Forever 21 has perfect and cheap options here or Levi's has great skinny black options here as well)

*Not pictured:  rubber gloves. They are an awesome idea to keep your hands from getting covered in dye.

I began with a pair of black jeans that I had in my collection and created an accordion style fold (lengthwise) across each pant leg - it’s a basic gather and pinch fold. I'm wanting to create a striation with the dye to try to emulate the streaks in the original jeans, so instead of dipping the full pant in bleach, I'm trying to only have it cover smaller portions.

New Dress A Day - DIY - Hudson Jeans - Collin Brit Jeans

One the jeans were pinched, folded, and clipped...

New Dress A Day - DIY - Hudson Jeans - Collin Brit Jeans

...I began the dye removal in the kitchen.  I filled a pot with boiling water, the dye fixation liquid, and then bleach to make the process go a bit faster.

New Dress A Day - DIY - Hudson Jeans - Collin Brit Jeans

After I was happy with the amount of color removed, I dried the jeans and began to remove the clips to begin the dye adding process!

New Dress A Day - DIY - Hudson Jeans - Collin Brit Jeans

I grabbed dye in blue and red as well as some straws that are helpful in applying and blowing the dye to make streaks. (You can really use anything for this step - paintbrushes, q-tips, get creative!) If your pants are completely dry or depending on the kind of material that you're working with, the dye might not stick immediately. Feel free to add a little water - use a damp paper towel - to help make the dye really adhere.

New Dress A Day - DIY - Hudson Jeans - Collin Brit Jeans

After letting the dye sit and dry, I quickly gave them a rinse under cold water, and then tossed them into the dryer to set everything in place.

Post DIY, I have pants that totally match the original Hudson ones!

New Dress A Day - Hudson Jeans Copycat - DIY - dyed jeans

They have this rock star/Jackson Pollock-ish feel to them which makes me feel like Gwen Stefani!!

New Dress A Day - DIY - Hudson Jeans - Collin Brit Jeans

Such a fun way to add a little bit of flair to an old pair of jeans!!

New Dress A Day - DIY - Hudson Jeans - Collin Brit Jeans


Shandee's NDAD Creation

Shandee is a girl after my own heart. We share a love of vintage jewelry so when I saw what she made with her grandmother's earrings, I swooned!! For those costume jewelry fans, I think you're going to swoon too!  See what Miss S made...

My remake isn't clothing, but jewelry! I LOVE true vintage items, even though a lot of them are not wearable. When my grandma passed away last year, I was left with tons of awesome costume jewelry. Most of it being gorgeously gaudy earrings that I would never wear as such. I didn't want to toss it all out, and didn't want it to sit forlornly in a drawer, so I decided to convert them into items I WOULD wear.

I bought a bunch of cheap adjustable rings on eBay (here's a bunch on Amazon!), snapped the posts & clips off the back of the earrings, did whatever tinkering was necessary to get the ring base to fit flush against the piece of bling. For some I filled the hollow inside with epoxy, others I cut circles of old gift cards to make the back surface flat.

New Dress A Day - Vintage DIY Rings - Old Earrings

I then used good sturdy craft glue - I've found E6000 is the BEST for quick-setting and durability - to affix the ring to the bling. And what do I end up with? A ton of cute, vintage cocktail rings!

New Dress A Day - Vintage DIY Rings - Old Earrings

I also used one of the earrings to make a matching fascinator, by gluing feathers to a clip.

New Dress A Day - Vintage DIY Rings - Old Earrings

Shandee, you're fabulous!! I think I'd have fun playing with all of your vintage baubles. Turning earrings into rings and fascinators is such a great idea to make use of your grandma's fabulous stash of jewelry in a way that you will want to wear it! I swear by E6000 too and just love the results. Can't wait to see what else you make!