Fun Times at CHA High

I had a fun weekend of checking out lots of fab crafts at the CHA (Craft & Hobby Association) trade show that just happened to be a hop, skip, and a jump away from me in Anaheim.  I saddled up with my crafty pal, Sonya Nimri, to check out all the fun goodies. Let's just say that once I walked in and saw this beaded curtain, I fell in love and immediately wanted to make one.  Unfortunately I am without rogue doorways or spaces that need such a curtain, which is probably a good thing as I can only imagine how long a project like this would take to tackle/work on/finish.

New Dress A Day - DIY - CHA Winter 2013

(*However let it be known that I am not opposed to anyone making it for me...in that case, I'm sure a place would present itself rather quickly!)

I also became obsessed with a paper mache elephant that was fuchsia.  You paint anything fuchsia and I'm totally on board.

New Dress A Day - DIY - CHA Winter 2013

I had fun making jewelry at the DCWV booth where there were beads, jump rings, clasps, and jewelry pliers galore!!

New Dress A Day - DIY - CHA Winter 2013

I was quite happy with my little project.

New Dress A Day - DIY - CHA Winter 2013

That was one of the most fun parts of the show - all the crafty projects that were available to be made at most all of the vendor booths!  At the Offray ribbon booth, it was DIY headband time!!

New Dress A Day - DIY - CHA Winter 2013

Sonya was cranking her band out...

New Dress A Day - DIY - CHA Winter 2013

...before I could even pick my ribbon!!  (I went with animal prints, because you just can't go wrong.)

New Dress A Day - DIY - CHA Winter 2013

All that was needed was a headband base (this one had a foam layer on top of the plastic), two different prints/colors of ribbon, and a glue gun.  Easy peasy!  The ribbon was already cut for us, but I'd say trim at least a yard of both of your ribbons.

All you have to do is dab a bit of glue at one end of the headband base, and then begin wrapping your ribbon around the headband, covering all of it.  When you get to the other end, hot glue the ribbon down to hold it in place.  Next, take your contrasting ribbon and glue it down to one of the headband's ends and begin to wrap this around the ribbon you already put down.  This should be more spaced out than your base ribbon.  (I had seven rotations of this ribbon.)  Now, when you get to the other side, glue the ribbon in place and repeat this step going the opposite direction to create a criss cross effect.  Glue your end in place once you make your way back, trim edges, and then rock your band!

New Dress A Day - DIY - CHA Winter 2013

Our lovely Offray tutorial givers were super helpful when I thought mine looked awful about 1/3 of the way in.

New Dress A Day - DIY - CHA Winter 2013

Sonya and I ended up using the same ribbon and totally had matching headbands.  (PS, I love this shot because it makes me look like I have super short, Michelle Williams hair!!)

New Dress A Day - DIY - CHA Winter 2013

We found amazing paints that end up looking like beads and pearls when affixed to fishing line...

New Dress A Day - DIY - CHA Winter 2013

...and we also loved these cool molds that could shape fondant into cupcake toppers or clay into medallions.

New Dress A Day - DIY - CHA Winter 2013

We also ended up spending a whole lot of time at the Scotch booth playing with all their colorful tapes.  The colors were such fun - Sonya decorated a mirror and I made fun shapes, er lines, on a mini-shopping bag.

New Dress A Day - DIY - CHA Winter 2013

Craft Attitude's booth was also another treat, as their image transfer paper is no joke, and we got to hang with the always chic Jonathan Fong!

New Dress A Day - DIY - CHA Winter 2013

They too had an elephant.  Do I see a trend forecast for 2013??  Elephant fever??

New Dress A Day - DIY - CHA Winter 2013

I left chock full of inspiration and was glad to be taking notes on my iPhone to keep in mind for future projects.  Nothing like a little bit of ribbon and scissors to get a girl's wheels turning!

Hope everyone had a fantastic weekend, from relaxing to watching NFL and perhaps having your team win, to heading to the movies, or watching Tina Fey and Amy Poehler host the Golden Globes.  Fun week ahead...lots of outfit posts to come!!

Lei's NDAD Creation

(Before we begin, I know there's been some of you having issues with photos coming in on the daily newsletter.  I'm sorry for the annoyance and it's getting worked on :)  In the interim, for those of you reading this from the comforts of your email inbox, just scoot over to the blog until the issue is amended.  Thanks for all your patience!)  OK, on to the remake!! Lei submitted not just one piece made from a muumuu, but three pieces which totally blew me away!!  I love when a piece can be transitioned into multiple things.  Here's her story...

Dear Marissa, Greetings from the Philippines!  Yes, your blog has reached the other side of the world.  Your blog and your story inspired me to take up sewing – I just love how you can transform some outlandish and outdated piece into something that is stylish. This muumuu is a giveaway from my mom's friend.  It was way too big and it looks hideous and grandma-ish on me.

New Dress A Day - DIY - Muumuu

It has been lying in our closet for years but the fabric is so soft, the print so pretty and so cool to the eyes, that I never got rid of it.  After stumbling upon your blog, I knew I had to do something to make it wearable.

New Dress A Day - DIY - Kimono Shoes DIY

And thanks to the inspiration from your muumuu recreations, I was ready to go. 

The muumuu has a pretty embroidery around the neckline, so I knew I wanted to keep it intact.  I removed the sleeves, cut and sewed the sides, and took away some of the length.  I love the feel of the dress on my skin and who would ever think that it came from a hand-me-down over-sized muumuu? 

New Dress A Day - DIY - Kimono Shoes DIY

There was so much material left from the length of the dress that I thought about making another piece from it.  The sleeves had some embroidery so I cut them up and stitched them together to make a top.  Isn't it pretty?  I wore it with my cardigan and I thought one of these days, I'd wear it on top of my swimsuit as a sarong or just wear it as a skirt too! 

New Dress A Day - DIY - Kimono Shoes DIY

But wait, there's more...

I'm also into baby shoes these days and with the scrap fabric from the muumuu, I made a pair of kimono shoes for babies.  

New Dress A Day - DIY - Kimono Shoes DIY

I have to practice a bunch more on making kimono shoes, but think they turned out great.  Thank you for the inspiration Marisa! Love, Lei 

I want a pair of these kimono shoes for me.  Lei, if you have the steps for making these shoes, send them my way and we'll do a tutorial here on the blog.  Love how they came out and I love that you have made your wardrobe larger just by tackling one piece!!  Thank you for your creativity!

Aparna's NDAD Creation

I love me some accessory DIY action, so Aparna's project is just what the doctor asked for!!

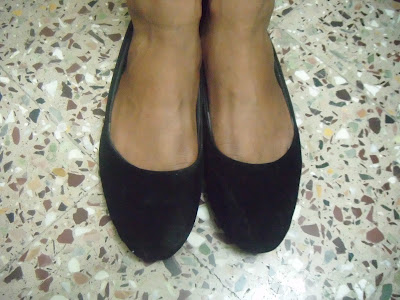
Hello Marisa - I love reading your blog and your ideas.  It is quite amazing the way you turn thrift finds into something oh-so-fashionable!  I am so excited to be sending you my creation!   This is a plain old pair of shoes that my sister picked up for about $2.50.

New Dress A Day - DIY - Before Shoes

They were so boring that they could put anyone to sleep, so I decided to jazz them up for her :)

Let's see how Aparna jazzes these puppies up!!

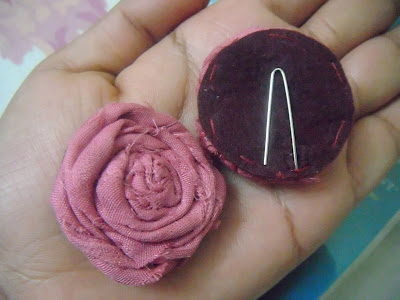
I used a piece of pink material lying at home to make a pair of rosettes. 

New Dress A Day - DIY - Shoe Clips

I glued them onto some felt and used bell clips for attaching them to the shoes. 

New Dress A Day - DIY - Shoe Clips

The rosettes turned out so great, that I made another pair of bows so the shoes can be worn with different outfits. 

New Dress A Day - DIY - Shoe Clips

I did not spend a cent jazzing the shoes up and used all the materials lying in my craft stash to make these. 

New Dress A Day - DIY - Shoe Clips

Hope you like and thank you Marisa for inspiring all of us!  Love, Aparna 

Thank you for sharing this awesome, fun, and easy project with us Aparna!  It's so fun to think that you can really take a basic pair of flats and DIY shoe clips to change them up each day.  For more from Aparna, check out her blog here!