Copycat: Hudson Brit Punk Jeans

I haven't done a fun denim DIY in a little while, so when I found these rocker jeans by Hudson I had to add them to the list!! I saw them being worn by Lucy Hale (Aria) on Pretty Little Liars (yes, I've started to get a little sucked in!) and the wheels started turning. (For those Pretty Little Liars fans, you can head over here to HelloGiggles to read the post with the full TV tie in!) New Dress A Day - Hudson Jeans Copycat - DIY - dyed jeans

The actual jeans on Lucy are by Hudson and they’re an ode to the Union Jack flag, in a deconstructed way. It's Brit punk, fo sho, and I wanted to try my hand at remaking them!

New Dress A Day - DIY - Hudson Jeans - Collin Brit Jeans

The key to remaking this piece is the base....

...a pair of black jeans that can be bleached and re-dyed with red and blue shades to match the original piece.

Here’s a rundown of the supplies you’ll need:

New Dress A Day - DIY - Hudson Jeans - Collin Brit Jeans

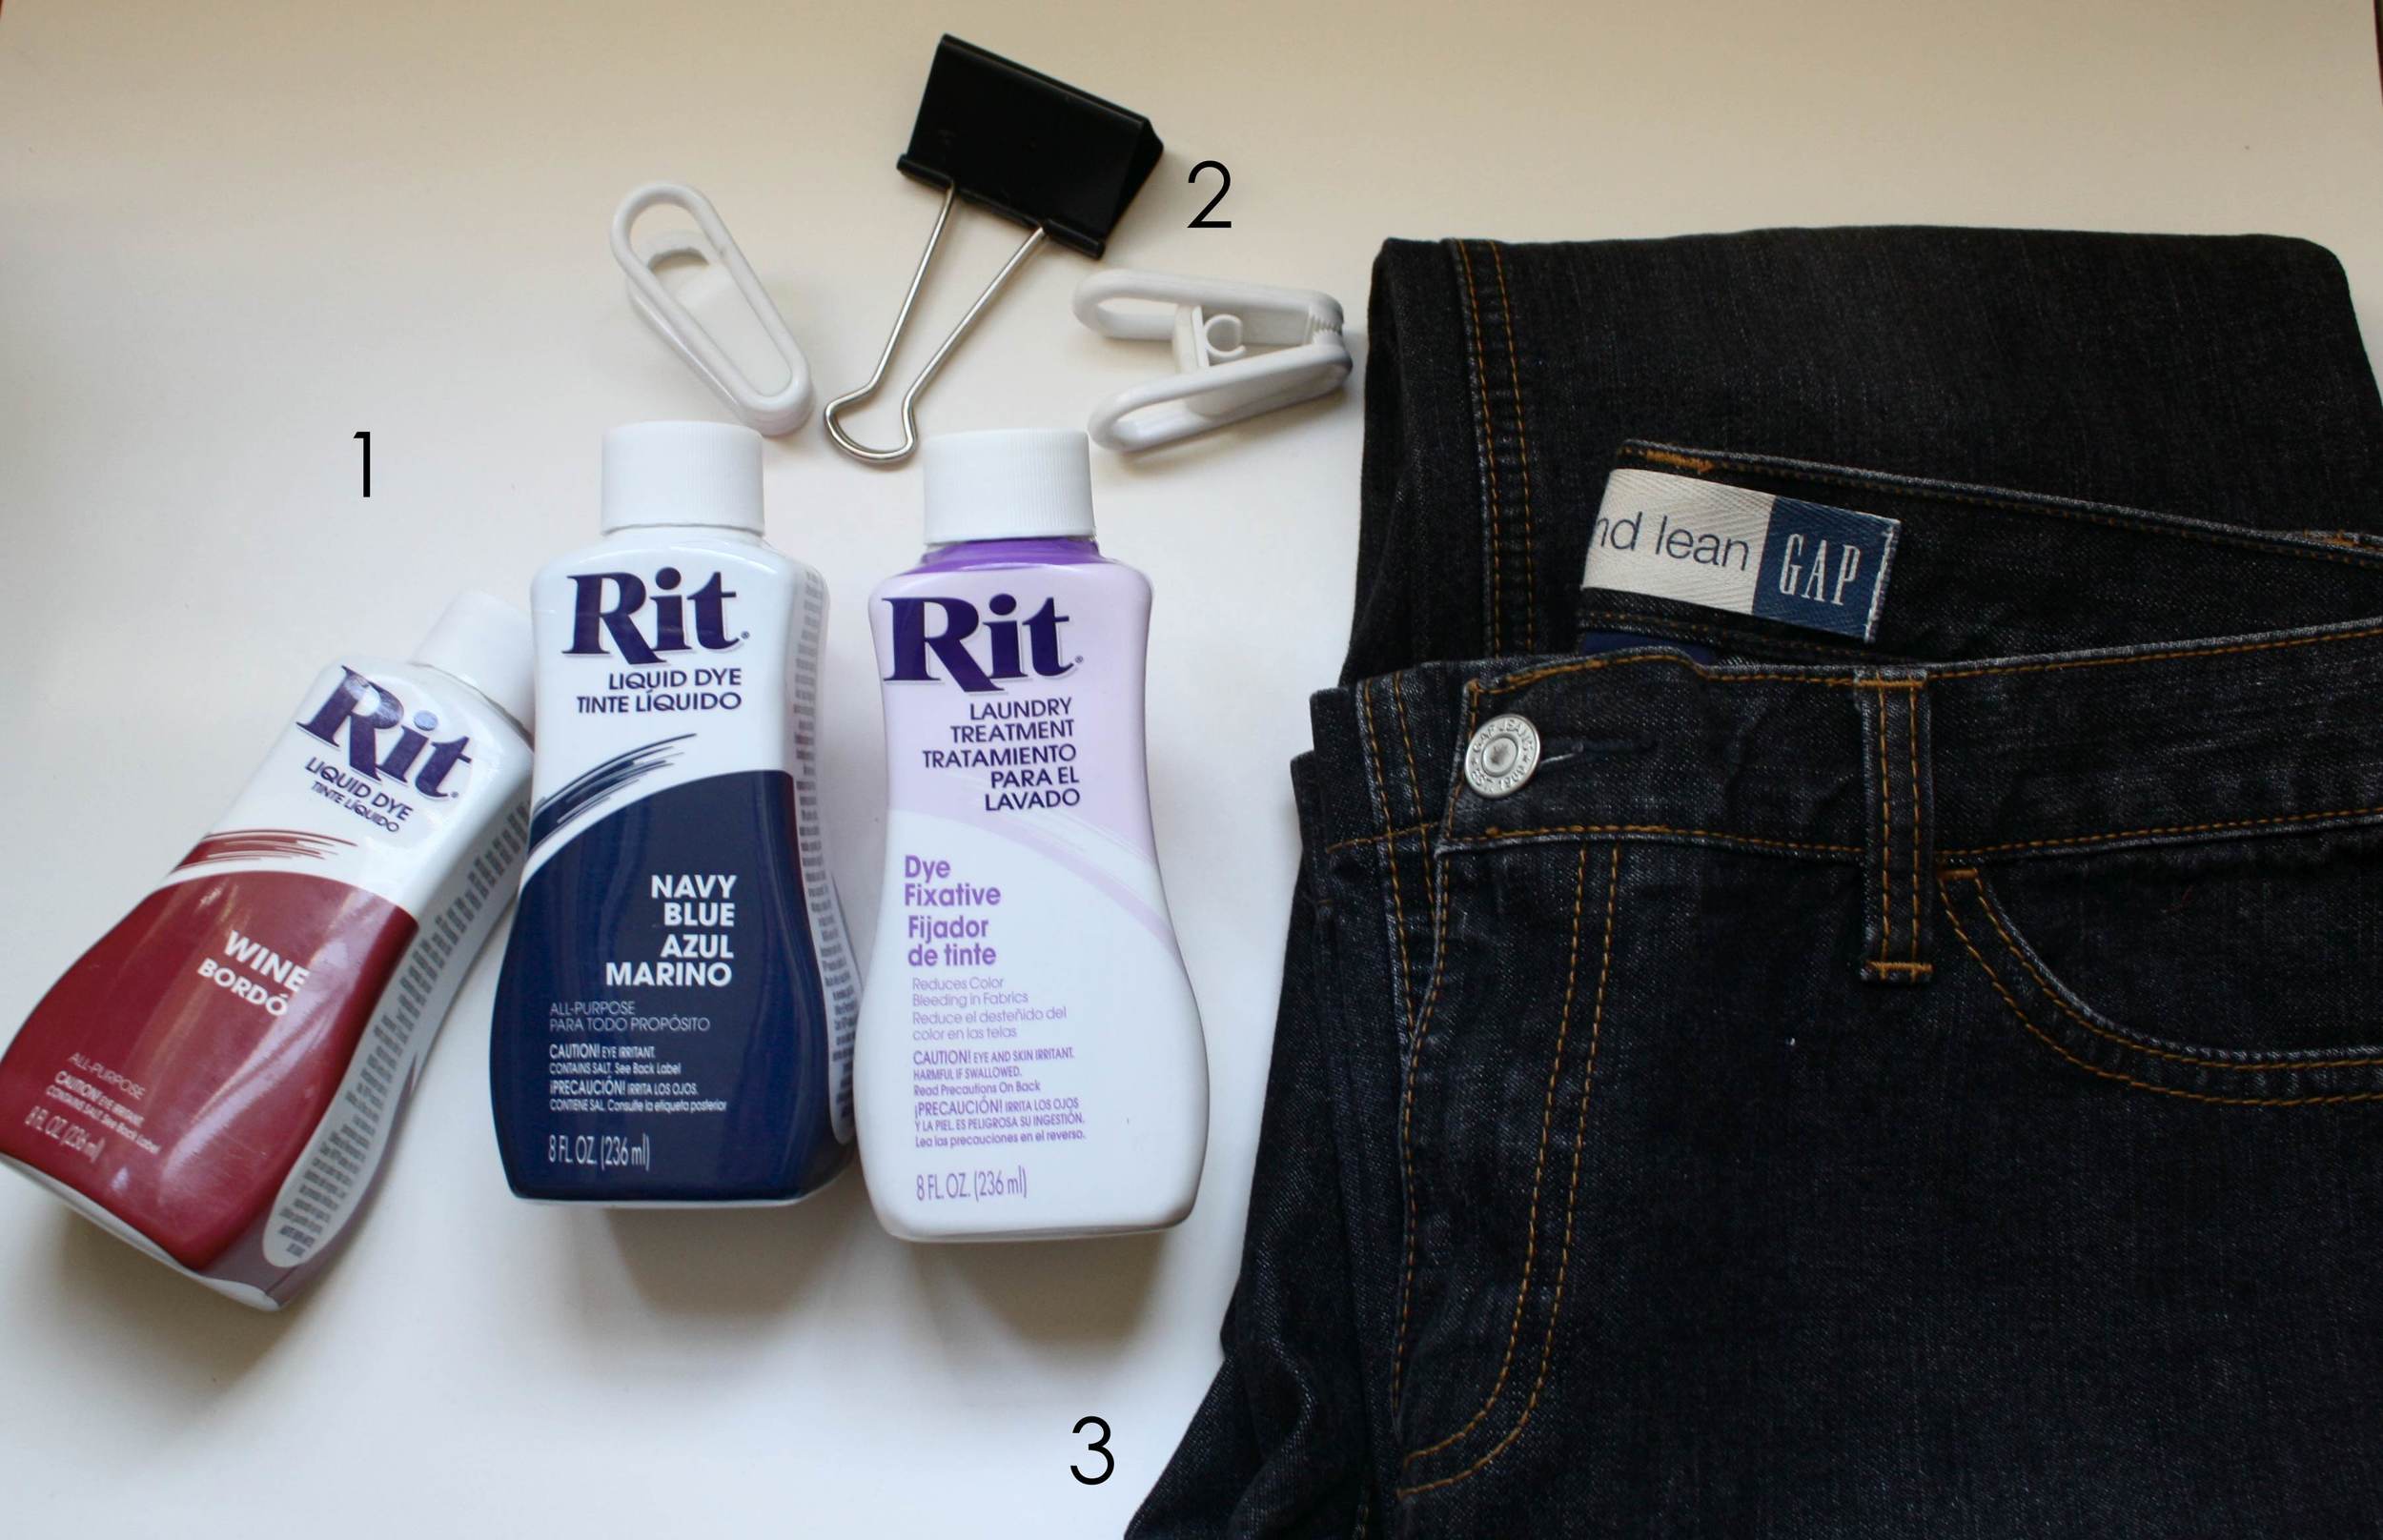
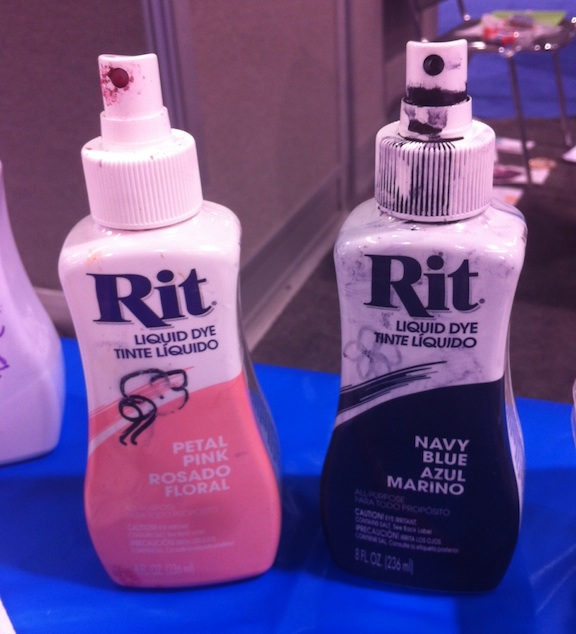
1. Dye and dye remover/bleach – I grabbed a few shades of Rit Dye to match as well as their Dye Fixative, but I ended up going with some basic bleach as well)

2. Any sort of clips/clamps

3. Black Jeans (Forever 21 has perfect and cheap options here or Levi's has great skinny black options here as well)

*Not pictured:  rubber gloves. They are an awesome idea to keep your hands from getting covered in dye.

I began with a pair of black jeans that I had in my collection and created an accordion style fold (lengthwise) across each pant leg - it’s a basic gather and pinch fold. I'm wanting to create a striation with the dye to try to emulate the streaks in the original jeans, so instead of dipping the full pant in bleach, I'm trying to only have it cover smaller portions.

New Dress A Day - DIY - Hudson Jeans - Collin Brit Jeans

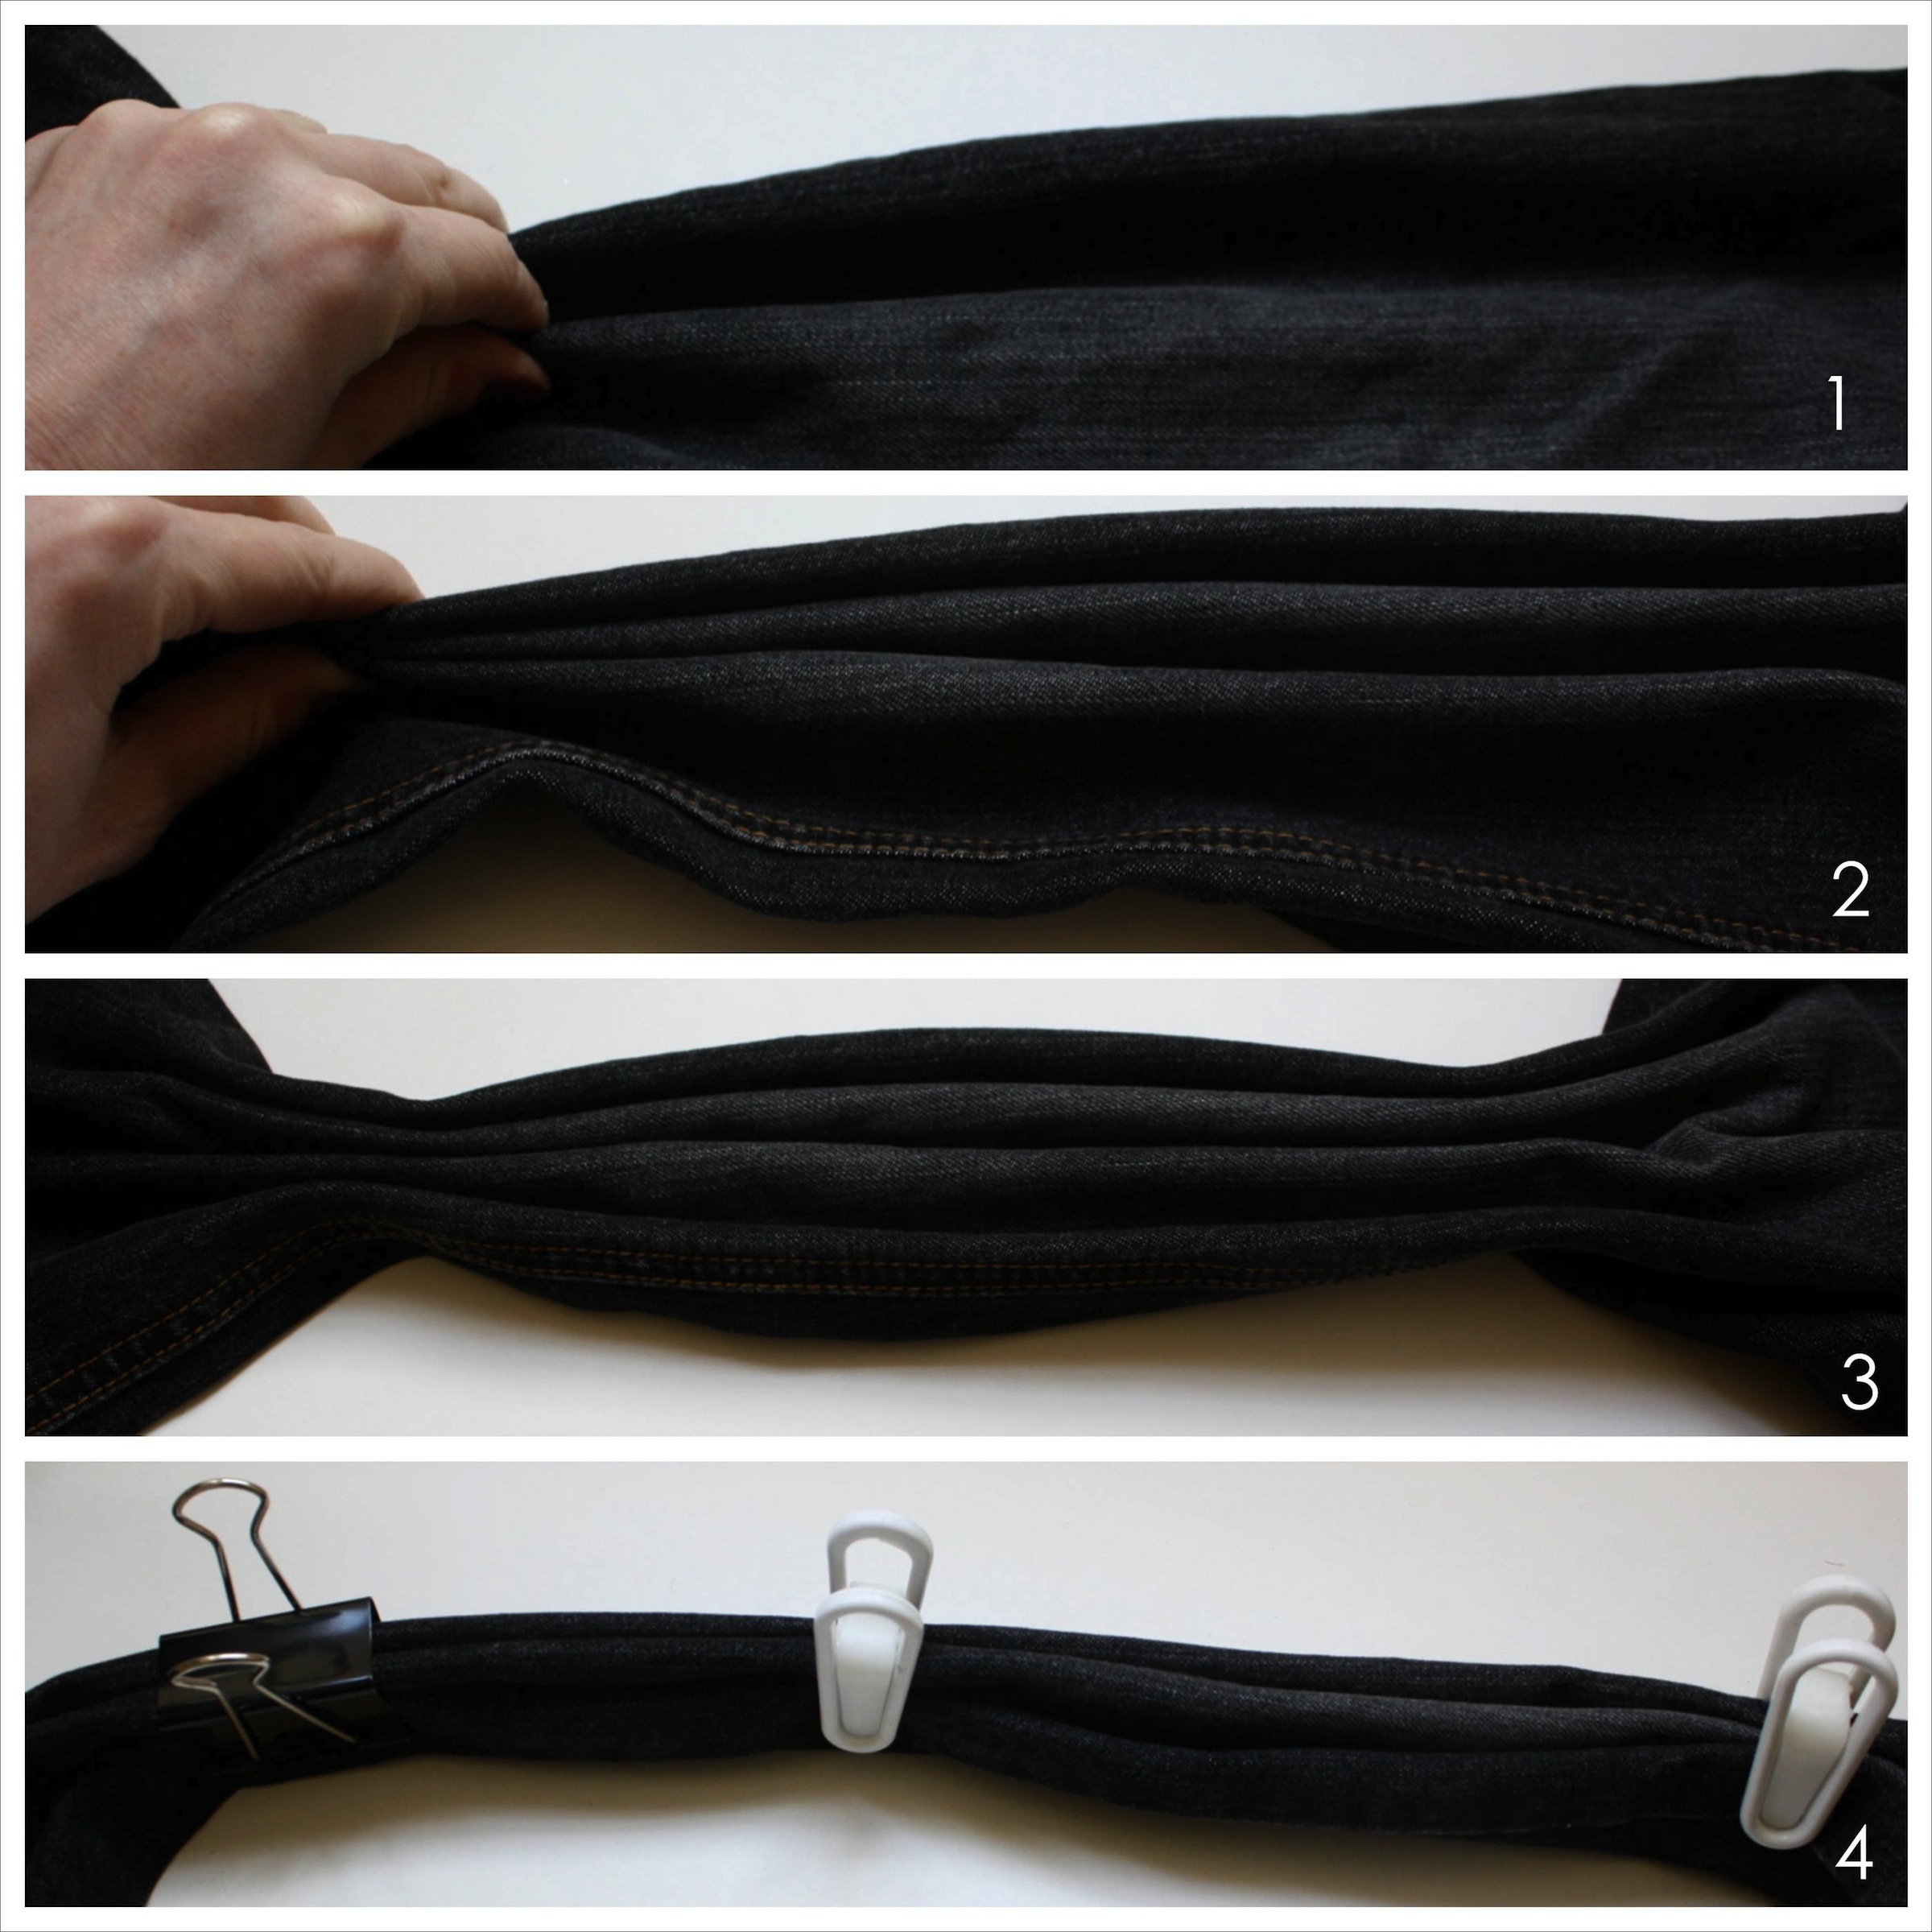
One the jeans were pinched, folded, and clipped...

New Dress A Day - DIY - Hudson Jeans - Collin Brit Jeans

...I began the dye removal in the kitchen.  I filled a pot with boiling water, the dye fixation liquid, and then bleach to make the process go a bit faster.

New Dress A Day - DIY - Hudson Jeans - Collin Brit Jeans

After I was happy with the amount of color removed, I dried the jeans and began to remove the clips to begin the dye adding process!

New Dress A Day - DIY - Hudson Jeans - Collin Brit Jeans

I grabbed dye in blue and red as well as some straws that are helpful in applying and blowing the dye to make streaks. (You can really use anything for this step - paintbrushes, q-tips, get creative!) If your pants are completely dry or depending on the kind of material that you're working with, the dye might not stick immediately. Feel free to add a little water - use a damp paper towel - to help make the dye really adhere.

New Dress A Day - DIY - Hudson Jeans - Collin Brit Jeans

After letting the dye sit and dry, I quickly gave them a rinse under cold water, and then tossed them into the dryer to set everything in place.

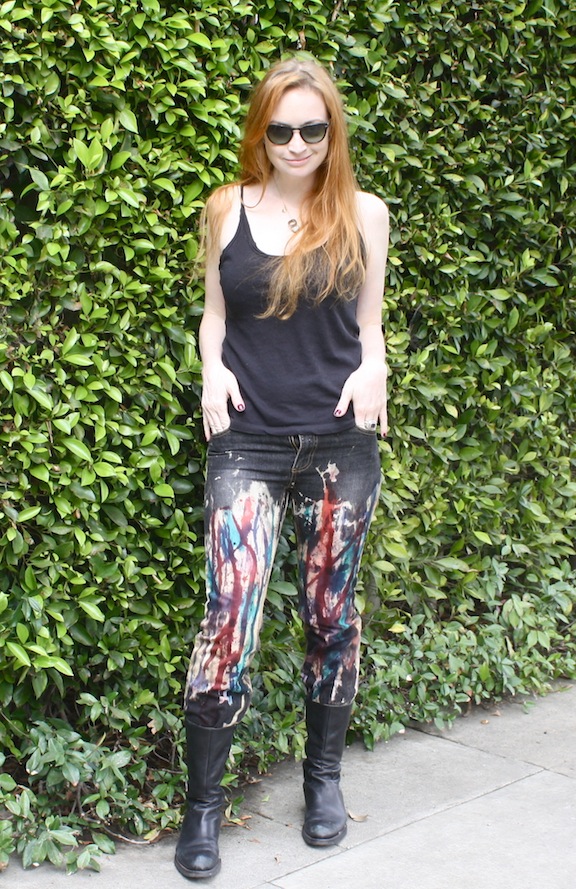
Post DIY, I have pants that totally match the original Hudson ones!

New Dress A Day - Hudson Jeans Copycat - DIY - dyed jeans

They have this rock star/Jackson Pollock-ish feel to them which makes me feel like Gwen Stefani!!

New Dress A Day - DIY - Hudson Jeans - Collin Brit Jeans

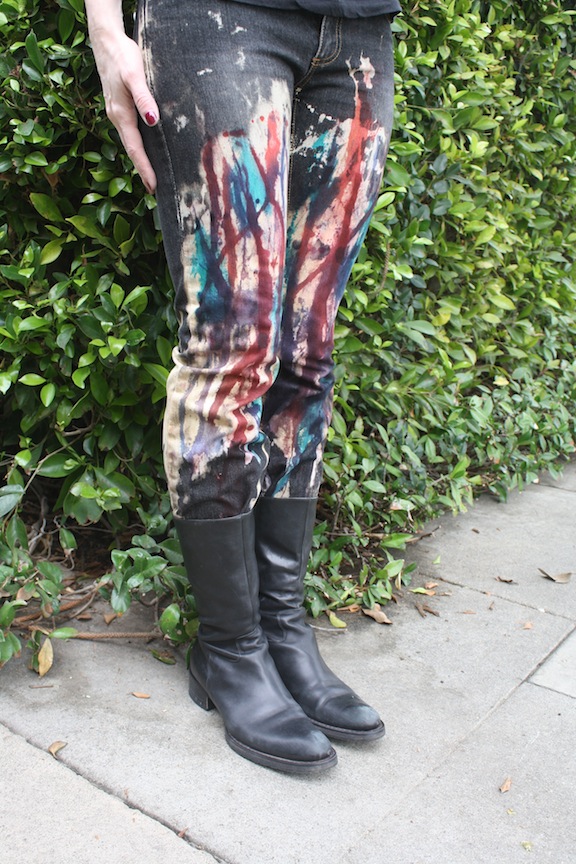
Such a fun way to add a little bit of flair to an old pair of jeans!!

New Dress A Day - DIY - Hudson Jeans - Collin Brit Jeans


DIY: Floral Headpiece

Because it was a CRAZY 80 degrees today in Southern California, I felt the need to get into the summer spirit!!  When January gives you 80 degrees, you dye paper flowers and make floral headpieces, obviously :) I started off with my materials...

New Dress A Day - DIY - Paper Flower Headpiece - Rit Dye

I wanted to make a headpiece using elastic, but then had a headband base that I thought I'd use as well!  This project would also work wonders, turning the flowers into pins with adhesive pin backs too if you'd like to go that route.  The final piece of this sunny day DIY are paper flowers, these coming from Prima Marketing.

I sorted through an assortment of shaded of Rit Dye...

New Dress A Day - DIY - Paper Flower Headpiece - Rit Dye

...and got to spritzing!

With these paper flowers, there's no need to wet them before dyeing.  Just point and shoot!

New Dress A Day - DIY - Paper Flower Headpiece - Rit Dye

To set the colors, just toss the flowers in the microwave.  I nuked each flower individually for about 10 seconds, but feel free to combine flowers and put them in for a longer period of time (20/30 seconds).  Just make sure you don't put in any flowers with metal attachments - this would be the case for the smaller flowers and the leaves - just let them dry on their own.

New Dress A Day - DIY - Paper Flower Headpiece - Rit Dye

...and then they're ready for affixing!  How pretty did they turn out?

New Dress A Day - DIY - Paper Flower Headpiece - Rit Dye

Because these guys are paper, hot glue would make a perfect adhesive to affix them to your elastic/headband!  (HG is a quick dry method as well, making it a perfect adhesive if you're working with kids.)  I opted to go the E6000 route because I had some time to let everything dry and it was out already from working on another project.  Dontcha love the reasoning??

New Dress A Day - DIY - Paper Flower Headpiece - Rit Dye

After affixing flowers to my headpiece, I chose one larger flower and leaf for the headband.

New Dress A Day - DIY - Paper Flower Headpiece - Rit Dye

I let my hair accessories dry and then put them on for a little fashion show!!

New Dress A Day - DIY - Paper Flower Headpiece - Rit Dye

I paired my headgear with a vintage floral dress (it's got blue, yellow, and pink embroidered flowers!!!), a pair of shades that I found at Forever 21, and my shiny golden Steve Madden heels.

New Dress A Day - DIY - Paper Flower Headpiece - Rit Dye

I got lots of fun comments on Instagram calling this look a mix of Frida Kahlo and a flower girl, both of which I'll take!!

New Dress A Day - DIY - Paper Flower Headpiece - Rit Dye

Oh, and here's a closeup of the headband - it makes a subtle statement just using one of the bigger flowers.

New Dress A Day - DIY - Paper Flower Headpiece - Rit Dye

I'm ready for summer!!  Depending on how long this warm kick lasts, I just might be wearing this all weekend long!

New Dress A Day - DIY - Paper Flower Headpiece - Rit Dye

Happy Friday, friends!!

Copycat: ASOS Lace Neck Trim Blouse

Let's be honest, any shirt that has some sort of collar embellishment or flair is a collar that I want to befriend! I loved this shirt when I first saw it being worn by Jaime King on Hart of Dixie this season and it was actually was a maternity top, something that I discovered when I found out that it was an ASOS piece. I wanted to remake it immediately because it seemed like something that could be finished in a jiff using items found in my stash of supplies. (For those Hart of Dixie  fans, you can head over here to HelloGiggles to read the post with the full TV tie in!) Doesn't this scream “DIY me”! (Check out the actual shirt on Jaime by ASOS, here!)

Hello Giggles - Hart of Dixie - DIY - ASOS Crochet Top - Jaime King

On top of the fact that it was maternity, I also saw that they had two color options – melon and navy. I had a navy Forever 21 blouse in my closet already that was the same shape as the ASOS version, so I switched up the color a bit and went with navy as my base.

Hello Giggles - Hart of Dixie - DIY - ASOS Crochet Top


The key to this piece is a round neckline that the lace or crochet trim can be added to the edge of.

Here’s a rundown of the supplies you’ll need:

Hello Giggles - Hart of Dixie - DIY - ASOS Crochet Top - Supplies

1. Lace trim or a crocheted doily (You can cut the scalloped edging from the doily to make it work if you have one at home or can snag one from your mom’s stash! I have so many in my collection that I've scored from my mama!)

2. Safety pins (These will work if you want a non-permanent lace neck.)

3. Thread & needle (For a more permanent lace neck.)

4. Your base blouse/top (I found a similar blouse in coral by Debenham's)

I began with two pieces of lace trim that I found at my local craft store. I played around with where I wanted to lay them before pinning them in place.

Hello Giggles - Hart of Dixie - DIY - ASOS Crochet Top - Jaime King

Once the location was set, I pinned the lace to the blouse (1) and began to hand stitch the lace directly to the top, post-pinning (2). I love things that aren’t permanent, so this is also something that you can make by just safety pinning the lace to the neckline so it’s easily removable.

Hello Giggles - Hart of Dixie - DIY - ASOS Crochet Top

In less than 20 minutes, you’ve got a new shirt that's pretty darn similar to the one by ASOS!

Hello Giggles - Hart of Dixie - DIY - ASOS Crochet Top - Jaime King

It’s something super easy that can work on the edge of basically anything!

Hello Giggles - Hart of Dixie - DIY - ASOS Crochet Top - Supplies

It’s a dainty little addition and a super sweet touch to really add some femininity to a top.

Hello Giggles - Hart of Dixie - DIY - ASOS Crochet Top

Now what sweater to wear on top of my new shirt that allows this fab neckline to peek through??