Game of Thrones Final Season Costume! 🐉❄️

To celebrate the final season of GOT, I’m repurposing my Sansa Stark costume I made for a Halloween party a few years ago. I used two pieces that needed a little bit of work - this bodysuit was thrifted...

Vintage Bodysuit, Game of Thrones

...and this lovely lace robe was a swap party score!!

IMG_8252.JPG

Somehow at the swap party, I failed to see this lovely spottage action.  Who's got two thumbs and isn't afraid of that spot??

Game of Thrones Robe

THIS GIRL!!

It's time to get cracking because “winter is coming.”

I started off costume prep by getting rid of this spotted area on the lace robe.  It's weird because this wasn't just a discoloration, but a hardened bit of something that got stuck to this piece.  Texture wise, it felt just like pockets do when gum is left in them when they go through the washer.  Super weird, right?

Game of Thrones Stained Robe

I decided to just follow the hem and trim off about five inches from the bottom.  The weird spot was gone in no time!

Trimmed off bottom, Game of Thrones robe

With the robe tweaked, it was time to dye!!  The character I'm dressing up as wears more muted tones and earth colors, so I decided to go with a shade of dark green.  I was super excited to dye both pieces because there are so many different bits of fabric that will take differently to the color.

GOT Robe, dyed

I added them to my washing machine...

GOT Robe, dyed with Rit Dye

...and out they came, dyed to perfection!!

GOT dyed bodysuit and robe

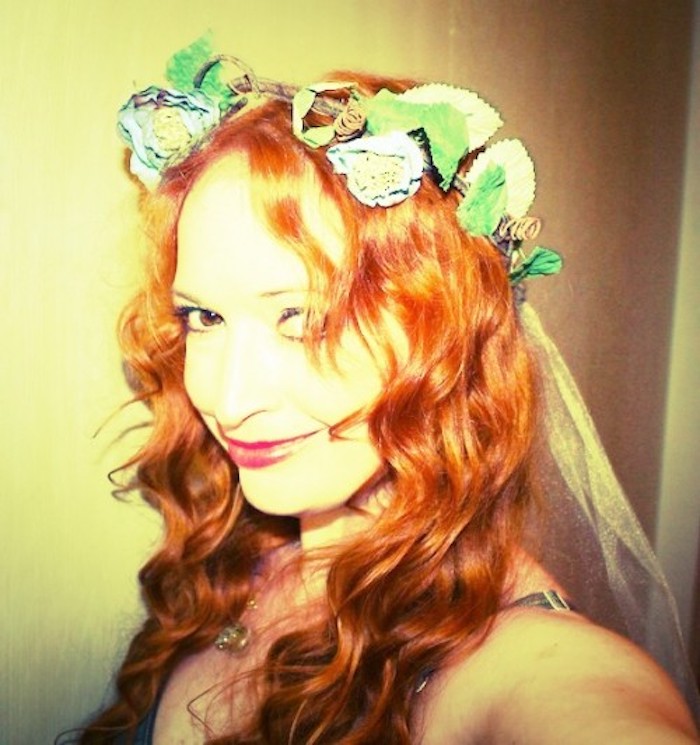
Now that dyeing was complete, it was time to work on my headpiece.  I found this wreath at a Salvation Army for $1.25.  I loved the paper flowers and it felt perfect for the vibe that I was going for.  I was originally going to make my own, but when I saw this one I just knew I could make it work!

GOT headband

Because it was too big for my head, I snipped the wire base of the wreath in half and adjusted it to fit me.  I overlapped each end of the wreath, unraveled the thinner bits of wire wrapped around the whole thing (you can see this thinner wire below) and rewired them on top of the layered bits to hold them together.

GOT headpiece

Now it was time for my main piece of flair...Tyrion Lannister!

Tyrion Lannister

I bought a poster of Peter Dinklage's character Tyrion Lannister and began to work on him, to make him easy to carry.

IMG_8262.JPG

I took an old cardboard box and cut one of the sides off from it.

Cardboard backing

I trimmed the poster to fit the square, coated the cardboard box with spray adhesive, and then affixed my man!!

Elmers Craft Bond

To make him comfortable to carry, I turned him into a shield of sorts with some duct tape!  Perfect for my arm to slip in and hold.

Taped Backing

I ended up adding some white tulle and hand-stitched it to the back of my headpiece to create a veil.

GOT Veil

Ready to see the entire look???

Sansa GOT Costume

I paired my dyed pieces with a pair of comfortable vintage boots and a fabulous gold brocade skirt that I bought a while back at Goodwill just to have in my collection.

Sansa GOT Costume

I'm really glad I talked myself into buying it years ago because it was the perfect complement to the ensemble!

GOT Sansa Costume

Is it weird that I totally want to wear this headpiece out and about??  I'll just remove the veil for everyday wearing :)

GOT Sansa Headpiece

I feel like a part of Winterfell.

GOT Sansa costume

Oh, and I can't forget my "raven" ring accessory.  We'll just pretend he's got three eyes!!

IMG_8272.JPG

The best part of my costume is that I will be wearing all of these pieces again!  That bodysuit, since is has underwire, is going to be a staple layering piece in my wardrobe!

IMG_8273.JPG

Will you be getting dressed up before the final episode?? We might need to curate outfits to wear on the series finale! ❄️🐉 ❄️

Remake: Black & Red Muumuu

You know I LOVE a muumuu. They’re flowy, they’re super comfortable, and they make you feel like you’re wearing pajamas! I mean, anytime I can get away with feeling like I’m in PJs outside my house, SIGN ME UP!

Check out this one I just picked up.

Black & Red Muumuu Before

I was obsessed with the pattern and loved the bottom portion of red!

Vintage Red & Black Muumuu

Because of the darker shades, I thought this would be something that could work as a chic dress to a cocktail party. And you’ve got to love the one pocket sitch!

Vintage Red & Black Muumuu

I didn’t want to change too much, so I’m keeping this project super simple. I started with my tiny Fiskars scissors and trimmed off the sleeves.

Vintage Red & Black Muumuu Cut Sleeves

Once both sides were trimmed…

Vintage Red & Black Muumuu Cut Sleeve

…I prepped a new seam, pinning the raw edges under. I started at the neckline and went all around the arms.

Vintage Red & Black Muumuu Pinned Sleeves

Quick stitch on the machine and I was ready to go!

Vintage Red & Black Muumuu Sewing

Hello cocktail party at the Parker Hotel in Palm Springs! I’ve arrived!

Vintage Red & Black Muumuu Upcycled

It’s so summery and feels very chic when you add some fun accessories and gladiator sandals!

Vintage Red & Black Muumuu Upcycled

I feel like I’m in a secret garden!

Vintage Red & Black Muumuu

Red sunnies and vintage necklaces rounded out the ensemble!

Vintage Red & Black Muumuu Upcycled

That’s right shoulders, you’re free from the sleeves! 😂

Vintage Red & Black Muumuu Upcycled

Easy, peasy, off with the sleevesies!

Vintage Red & Black Muumuu Before/After

DIY: A Christmas Story Inspired Ugly Sweatshirt 🎄👢🛋

This is my favorite time of year! The smells, the sounds, the outfits! I have a slew of vintage sweaters that are coming out for the holidays, but what to wear for the office ugly sweater party?? I’m going to DIY the ultimate piece inspired by A Christmas Story that’s on repeat in my household all Christmas day!

I grew up watching A Christmas Story and there are so many iconic scenes (the tongue on the lamp post still gives me agida!) but my favorite involves the leg lamp that Ralphie’s dad orders! I think I was obsessed as a kid with this lamp purely because it was a leg with a stiletto! But I’m using the leg as inspiration for my project and need to score all the supplies to recreate from JOANN.

Joann - DEC - Supplies.JPG

I grabbed a red sweatshirt (ugly sweatshirt party sounds about right!), felt, fringe, mesh fabric, fabric glue, velvet ribbon, iron-on lettering, and an LED light necklace to get this project rolling.

I started with a template of the leg lamp I found online.

Joann - DEC - Leg Lamp Drawing.JPG

I’m not the best freehand artist, so using a pattern was the best move for me! I trimmed it into three main portions - the shoe, the leg, and the lampshade - that will be traced onto the coordinating fabrics.  

Joann - DEC - Trimmed Leg Lamp Drawing.JPG

I started with the leg and used a light beige felt! (Felt is used for all three portions of the lamp just because it’s a bit sturdier.) I traced then trimmed out my fabric.

Joann - DEC - Legs!.JPG
Joann - DEC - Legs Trimmed.JPG

I moved onto the shoe next! I grabbed adhesive-backed black felt for this piece and traced and trimmed.

Joann - DEC - Shoe Tracing.JPG

The leg was cut out, but it was missing a very important part...the fishnet tights! I found a mesh fabric that I wanted to place on top of the felt to give it a fishnet vibe. I placed the mesh on top of the felt and then trimmed and tucked the edges. Next came applying it to the sweatshirt along with the shoe which I affixed with fabric glue.

Joann - DEC - Fishnets & Shoes.png

Next came the lamp! I cut out a basic trapezoid-esque shape and wanted to give the shade a bit of a 3D feel so I took some matching velvet ribbon and glued down three lines to make it look like boning of sorts.  

Joann - DEC - Lamp Trim Gluing.JPG

With the leg and shoe attached, it was time to move the lampshade to the sweatshirt! And the lamp needs her fringe, so black fringe was added to the bottom of the lamp right off the bat. BUT, this is the coolest part of the sweatshirt. I wanted the lamp to light up, so I put some LED lights from a cute light up necklace right under the felt lampshade! This was the only portion of the sweatshirt that I sewed.

I started stitching down the left side of the felt piece going counterclockwise around the shade. As I stitched, I kept molding the lights in areas I wanted them to shine (and pushed them into place) as I went around the edges.

Joann - DEC - Lamp Assembly.png

Once I was happy with the light placement, I made my way around the rest of the shade and then made little stitches on the ribbon in the center to keep the lights in place. There’s a push button to turn the lights on that I placed at the top of the shade for easy access.

And there’s only one more piece to the sweatshirt puzzle to finish! A box with the letters FRAGILE (“fra gee lay”) on it, just like the one the leg came in, in the movie. I bought some brown corduroy and trimmed seven rectangular panels to form a box and layered two on each edge.

Joann - DEC - Fragile Box.png

I took small iron-on letters and placed them on a diagonal to cover the box and ironed in place.

The final bit of flare? Some “packing material” for the box which is just pillow stuffing. Stitch or glue...whatever tickles your fancy!

Joann - DEC - Fragile Box Stuffing.JPG

The final look was complete!

Joann - DEC - After Outside 3.jpg

I am SO in love with how this turned out!

Joann - DEC - After Inside 3 copy.jpg

The perfect piece to wear to my ugly sweater party!

Joann - DEC - After Outside.JPG

It’s LIT!!!! (Sorry, couldn’t help it! 😂)

Joann - DEC - After with Lights On.JPG

I promise you won’t shoot your eye out!

Joann - DEC - After Inside 4 copy.jpg

I think after I’m done wearing this sweatshirt, I’m just going to hang it on the fireplace because “it’s a major award!”

Joann - DEC - After Inside Lights 2 copy.jpg

You’re guaranteed to win Christmas with this interactive holiday sweater!

I “double dog dare you” that you won’t have the most fun wearing this!!

Joann - DEC - After Inside 5 copy.jpg
Joann - DEC - After Inside Lights copy.jpg

Happy Holidays!!

This post was sponsored by JOANN. 😃